Introduction
Working at height remains one of the most dangerous tasks in construction. In 2023, roofing contractors accounted for 26% of all fatal falls in the construction industry, resulting in 110 deaths. Beyond fatalities, NIOSH reported 22,710 nonfatal workplace injuries from ladders in 2020 alone. The most alarming finding: approximately 40% of ladder-related injuries occur because the ladder slides out at the base due to incorrect setup angle.
Those numbers reflect general ladder use. On a sloped roof, the risks stack. The ground below the ladder is often uneven, and the eave or fascia the ladder leans against sits at an angle rather than vertical — enough to cause a slide or tip with little warning.
The good news: most of these failures are preventable with the right setup, the right accessories, and consistent climbing habits.
TL;DR
- Set your ladder at the correct 4:1 angle and extend it at least three feet above the roofline
- Secure the base using ground stakes, rubber pads, or an automatic ladder leveler before climbing
- Maintain three points of contact while ascending and never overreach
- Inspect ladder and roof surface conditions before every use—wet or damaged surfaces significantly increase slip and slide risk
- Use roof hooks, stabilizer bars, and ladder levelers — each one reduces a specific failure point on sloped surfaces
Safety Guidelines for Using a Ladder on a Sloped Roof
Sloped roofs create a distinct hazard category. The ground surface below may be uneven due to landscaping, drainage slopes, or settled soil. The fascia or eave the ladder leans against sits at an angle rather than vertical, creating instability that compounds with every foot of height.
Safety on a sloped roof depends on three factors working together: selecting the correct ladder for the job, following proper setup discipline, and maintaining safe behavior during the climb. Each section below addresses one of these factors directly.
General Safety Precautions
Personal Protective Equipment
Start with baseline protection: non-slip footwear with aggressive tread, work gloves for grip, and a hard hat where overhead hazards exist. Personal protective equipment (PPE) does not replace proper setup—it's an additional layer of defense when something goes wrong.
Pre-Use Ladder Inspection
Inspect your ladder before every roof job. Check for:
- Bent or dented side rails
- Cracked, broken, or loose rungs
- Worn, missing, or damaged foot pads
- Defective or sticky locking mechanisms on extension ladders
- Loose rivets or bolts
A damaged ladder should never be taken to a roof job. The risk multiplies when height and slope are involved.
Understanding Ladder Duty Ratings
OSHA standard 1910.23(c)(3) requires that a ladder's maximum intended load account for the climber's body weight plus all tools, equipment, and materials being carried. This is not optional—it's a regulatory mandate.
ANSI classifies ladders by Duty Ratings:
| Duty Rating | Category | Weight Capacity | Best Use |
|---|---|---|---|
| Type III | Light Duty | 200 lbs | Not recommended for roof access with tools |
| Type II | Medium Duty | 225 lbs | Basic homeowner inspections only |
| Type I | Heavy Duty | 250 lbs | Standard contractor maintenance |
| Type IA | Extra Heavy Duty | 300 lbs | Professional roofing with toolbelts/materials |
| Type IAA | Special Duty | 375 lbs | Heavy-duty commercial roofing |
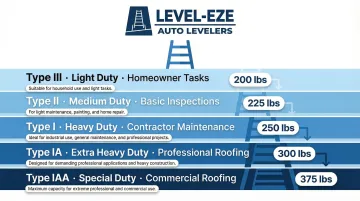
For roofing professionals carrying heavy toolbelts, shingle bundles, or power tools, Type IA or Type IAA ladders are the only safe choices.
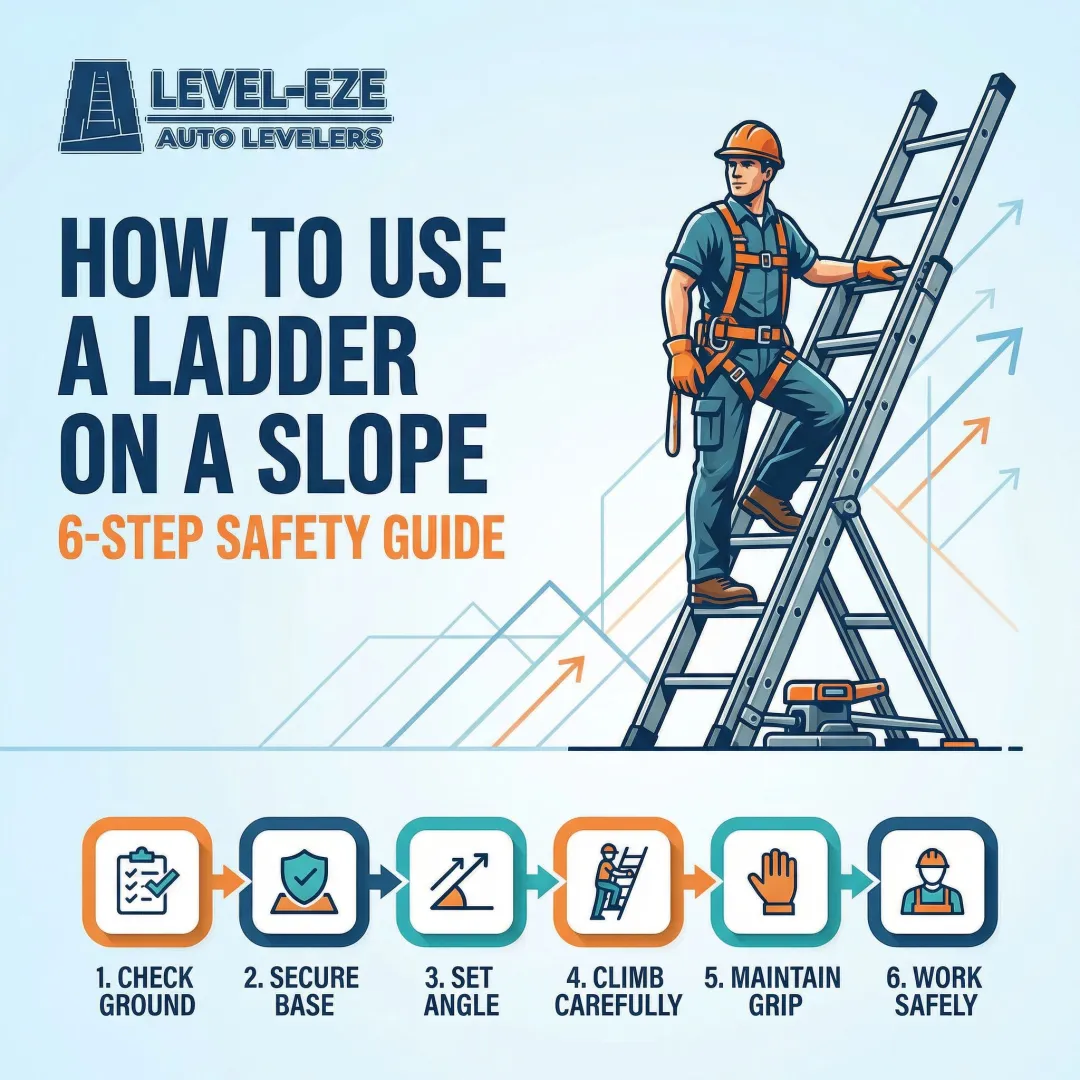
Safety During Setup and Positioning
The 4:1 Angle Rule
OSHA regulation 29 CFR 1926.1053(b)(5)(i) mandates that the horizontal distance from the top support to the foot of the ladder must be approximately one-quarter of the working length. This 4:1 ratio creates a 75.5-degree angle from horizontal.
If the ladder is too steep, your center of gravity shifts outward beyond the base, risking backward tip. Too shallow, and friction cannot hold the base in place—the ladder kicks out.
How to check the angle practically: Stand at the base with your toes touching the ladder feet. Extend your arms straight forward. Your palms should rest comfortably on the rung at shoulder height. If you're reaching up or down, adjust the base distance.
Preparing the Ground Surface
The ground at the foot of a roof edge is often neglected. Before placing your ladder:
- Remove debris, leaves, and loose materials
- Check for soft or unstable ground that will compress under weight
- Never allow feet to rest on ice, mud, loose gravel, or wet grass
- Ensure both feet contact solid, stable surface
The 3-Foot Extension Above Roofline
OSHA 29 CFR 1926.1053(b)(1) requires ladder side rails to extend at least 3 feet above the upper landing surface—roughly three rungs past the roof eave. This gives you a secure handhold when transitioning on and off the roof, a frequent fall location.
Without this extension, you're forced to lean forward and push off the top of the ladder, which can cause lateral slide or base kick-out.
Securing the Base
Mechanical securing methods for the base include:
- Ground stakes and tie-downs: Drive stakes into the ground around the feet and use tie-down straps to anchor the ladder in place
- Rubber anti-slip mats: On hard surfaces like concrete or asphalt, use textured rubber pads to increase friction
- Automatic ladder levelers: Purpose-built solutions like Level-EZE instantly adjust to uneven ground, widen the base footprint by approximately four inches, and meet ANSI standards for portable extension ladders. No blocks, wedges, or manual guesswork required.
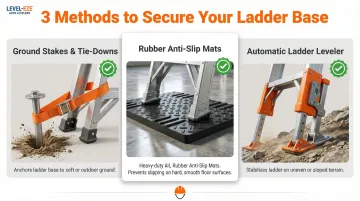
The locking mechanism engages with as little as 9 pounds of weight, so both hands stay on the ladder throughout setup.
Securing the Top
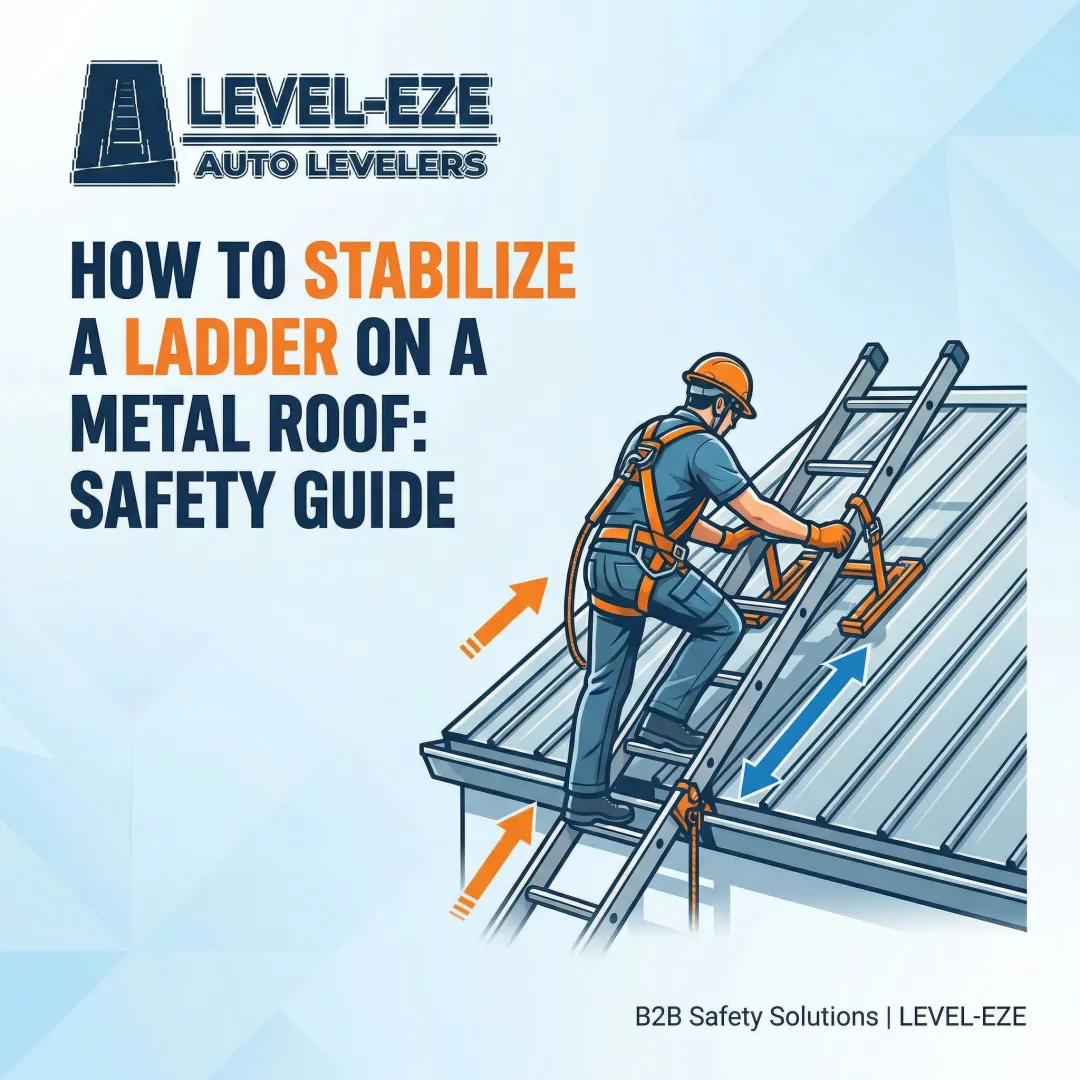
Once positioned, secure the top of the ladder:
- Tie off to a structural anchor such as eye screws fixed to fascia board
- Use a stabilizer bar to widen the contact area and prevent lateral movement
- Use roof-rated hooks if working from the roof surface itself
Never rely solely on the ladder's weight to hold it in place. Wind, sudden movements, or shifting materials can dislodge an unsecured top.
Safe Climbing and Operating Practices
The Three-Point Contact Rule
Maintain three points of contact at all times: two hands and one foot, or two feet and one hand on the ladder. This is non-negotiable on a sloped roof where a sudden shift has no safe recovery path.
Behavioral Risks During the Climb
Specific behaviors cause predictable accidents:
- Leaning sideways shifts your center of gravity outside the base width, causing lateral tip
- Carrying tools in both hands violates three-point contact and removes your ability to catch a slip
- Rushing the descent causes missed rungs and loss of balance
- Stepping higher than the third rung from the top removes your handhold and forces a dangerous forward lean
Transitioning On and Off the Roof
When getting onto or off the roof:
- Face the ladder and maintain grip on the rails
- Move one limb at a time—never release both hands or lift both feet simultaneously
- Check the roof surface material for grip and stability before transferring full weight
- Never rush this step, even on familiar roofs
Environmental and Surface Conditions That Affect Stability
Weather Conditions
Weather shifts risk levels faster than most people expect:
- Wet or dew-covered shingles: Reduce friction dramatically, making both ladder feet and climber boots slip-prone
- Wind: Can shift both the ladder and your center of gravity. The UK Health and Safety Executive warns that winds exceeding 23 mph actively affect a person's balance at height. Industry best practice: halt non-emergency roof work when sustained winds reach 20-23 mph
- Cold temperatures: Make ladder feet brittle and roof surfaces icy
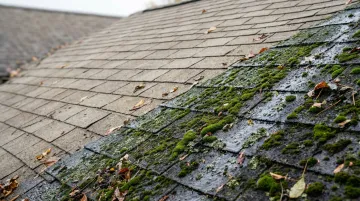
Roof Surface Material
Different materials present different grip levels:
- Smooth metal roofing: Extremely slippery when wet or covered in morning dew
- Algae-covered shingles: Reduce friction even when dry
- Newly installed surfaces: Loose granules act like ball bearings under ladder feet
A 2024 analysis citing Iowa State University research found that smooth roofing materials become dangerously slippery under morning dew or frost, while textured materials reduced slip-and-fall events by 100% in tests. Always assess surface conditions before you set up — once you're on the ladder is too late.
Surface type also interacts with time of day. Conditions that look safe at noon can be hazardous by early morning or late afternoon.
Seasonal and Time-of-Day Factors
Timing your work around conditions — not your schedule — reduces risk significantly:
- Morning condensation: Delay roof access until the sun evaporates dew
- Afternoon sun: Can soften certain surface materials like asphalt shingles, reducing grip
- Shadows: Make surface assessment harder and hide hazards like wet spots or debris
Common Safety Mistakes to Avoid When Using a Ladder on a Sloped Roof
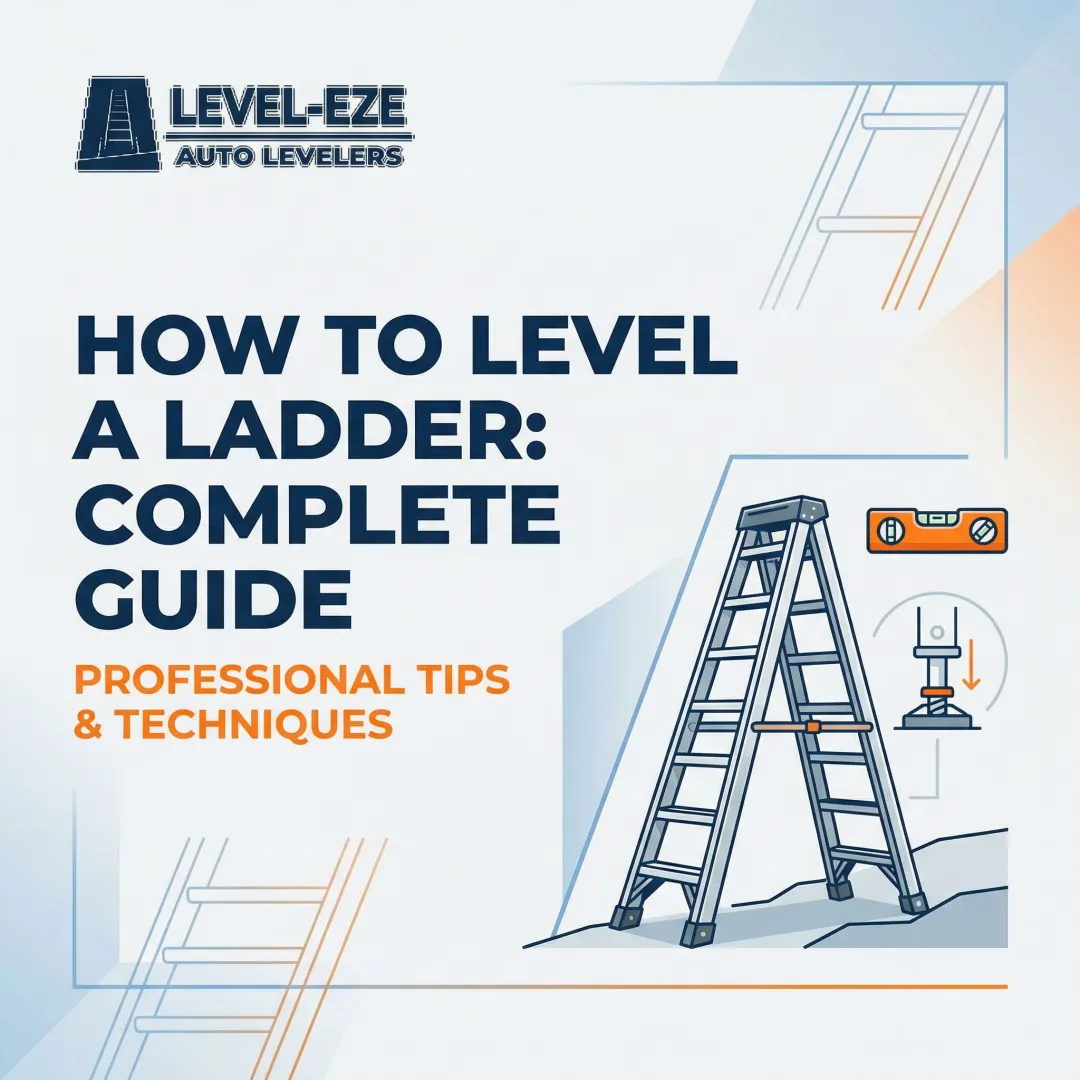
Not Leveling or Anchoring the Base
The most common setup mistake is assuming the feet will grip without leveling or anchoring. On a slope, even a small ground irregularity can cause the base to kick out under your weight — the base slides out in under a second, throwing you backward from height.
Skipping the Tie-Off
Skipping the tie-off — especially on short, familiar jobs — creates serious risk. A lateral slide at the top throws you from height before you can react. There's no job short enough to justify skipping this step.
Using the Wrong Ladder for the Job
Two ladder choices lead directly to preventable falls:
- Stepladders on slopes: designed for level surfaces only, they become unstable the moment the ground tilts
- Extension ladders that are too short: force you onto the top rungs, eliminating your handhold and your stability margin
Conclusion
Keeping a ladder steady on a sloped roof is not a single action but a sequence. The right ladder, a leveled and anchored base, correct angle, secured top, and controlled climbing behavior all have to work together. A gap in any one of them creates the conditions for a fall.
Treat every rooftop ladder setup as a fresh safety check, regardless of experience level. Conditions change with weather, surface wear, and load—and complacency is consistently cited as a root cause in ladder accident investigations. Most ladder accidents trace back to skipped steps during setup, not equipment failure. Tools like automatic ladder levelers eliminate one of the most common failure points—an unlevel base—so your checklist has one less variable to get wrong.
Frequently Asked Questions
Can you put a ladder on a sloped roof?
Yes, but it requires proper setup: the ladder must be placed at the correct 4:1 angle, the base must be on stable and level ground, and the top should extend three feet above the roof edge and be secured to prevent lateral movement.
What is the 4:1 ladder rule?
For every four feet of vertical height the ladder reaches, the base must be placed one foot away from the wall or structure. This is an OSHA requirement that prevents the ladder from tipping backward or having the feet kick out.
How much weight can a slanted roof hold?
This depends on the roof's structural design, materials, and age. Homeowners should consult a structural professional before assuming the surface can safely support a person, tools, and ladder weight combined.
What type of ladder is best for working on a sloped roof?
An extension ladder with non-slip serrated rungs is used to access the roof; a roofing ladder (extension ladder with roof hooks) is used once you're on the surface. Leveling accessories are especially useful when the ground at the base is uneven.
How far should a ladder extend above a roofline?
The ladder should extend at least three feet (roughly three rungs) above the roofline. This gives you a secure handhold when transitioning on and off the roof—a requirement reinforced by both OSHA and ANSI guidelines.
Should I use a ladder stabilizer or leveler on a sloped roof?
Strongly recommended. Sloped roof work almost always means uneven ground at the base, which destabilizes the ladder before you even climb. Stabilizers widen the effective base and improve grip; automatic levelers go further by adjusting to surface irregularities instantly, with no manual shimming required.