Introduction
Uneven ground is one of the most common setup hazards ladder users face, and an improperly leveled ladder creates serious fall risk. In 2020, NIOSH reported 161 workplace fatalities and 22,710 injuries tied to ladders — approximately 40% caused by the ladder sliding out at the base due to incorrect setup.
Most of those accidents were preventable. The problem is that a ladder can feel solid at ground level and still shift the moment weight shifts or the surface flexes. Results vary widely depending on terrain type, ladder design, and setup method — and getting it wrong doesn't always announce itself before it's too late.
What follows covers the equipment you need, a step-by-step leveling process, the most common mistakes, and when a purpose-built leveling device is worth the investment.
TL;DR
- Confirm all four ladder feet make firm, equal contact with the ground before applying any weight
- Always set extension ladders at a 75-degree (4:1) angle regardless of the surface
- Verify both horizontal and vertical alignment with a spirit level before climbing
- Never use rocks, loose bricks, or scrap lumber as shims—they create fall risk
- For repeated use on uneven terrain, automatic ladder levelers self-adjust and save roughly 6 minutes per ladder move
What You Need to Level a Ladder Safely
Grab the wrong materials before you climb, and you're already cutting corners on safety. Having the right tools ready prevents the kind of improvised workarounds — stacked boards, loose bricks — that cause falls.
Tools and Equipment
You'll need these core tools for safe ladder leveling:
- Spirit level or laser level – confirms both vertical and horizontal alignment before you step on a rung
- Tape measure – verifies the correct 4:1 angle (1 foot out for every 4 feet up)
- Solid wood or composite shims/wedge boards for minor surface corrections — no bricks, loose boards, or stacked materials
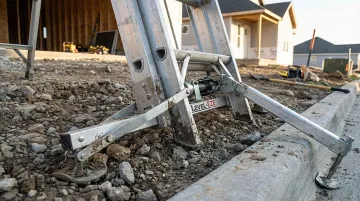
- A ladder leveler attachment for anyone working on uneven terrain regularly: automatic models like the Level-EZE lock into position the moment weight is applied and work on slopes, curbs, and stepped surfaces without manual adjustment

Never substitute household items like bricks or stacked boards. OSHA explicitly forbids placing ladders on "boxes, barrels, or unstable bases", as these materials compress, shift, or crack under load.
Pre-Use Inspection Checklist
Before leveling, inspect the ladder itself:
- Check all rungs for cracks or bending
- Inspect rail integrity for damage or corrosion
- Verify locking mechanisms on extension ladders are fully engaged
- Confirm the weight rating is appropriate for user plus tools
If the ladder fails any of these checks, set it aside — leveling a damaged ladder doesn't fix the underlying problem.
How to Level a Ladder: Step-by-Step
The steps below apply primarily to extension ladders on uneven outdoor terrain—the most common and highest-risk leveling scenario—but core principles carry over to other ladder types.
Step 1: Choose and Prepare the Site
Select a location as close to level as possible:
- Avoid soft soil, drain covers, muddy patches, and high-traffic zones
- Walk the area and note the degree of slope or unevenness
- Clear debris, loose gravel, or ice from the base area
- Use a wide foot pad or board under ladder feet on soft ground to prevent sinking
Step 2: Inspect the Ladder and Extend to Working Height
Extend the ladder to the required height and ensure locking collars are fully engaged. Follow the manufacturer's extension overlap guidelines—ANSI A14.2 requires overlap measured in feet based on total ladder length:
| Ladder Size | Minimum Required Overlap |
|---|---|
| Up to 32 feet | 3 feet |
| Over 32 to 36 feet | 4 feet |
| Over 36 to 48 feet | 5 feet |
| Over 48 to 72 feet | 6 feet |
Step 3: Set the Correct Angle
Position the base so the ladder sits at a 75-degree angle to the ground, following the 4:1 rule: for every 4 feet of vertical height, the base should be 1 foot out from the wall. OSHA 29 CFR 1926.1053(b)(5)(i) mandates this angle. On uneven ground, the 4:1 ratio still applies—shimming adjusts the footing, not the angle.
Verify the angle using either method:
- Tape measure check: If your ladder reaches 12 feet high, the base should sit 3 feet from the wall.
- 3-4-5 triangle check: A 3-foot horizontal distance, 4-foot vertical rise, and 5-foot diagonal confirm a right-angle triangle. Use this to verify positioning on flat surfaces—it doesn't replace the 4:1 ratio.
Step 4: Adjust for Uneven Ground
If one foot sits lower than the other:
- Place a firm, non-compressible shim (solid wood wedge or commercial shim) under the lower foot
- Build up the lower side until both feet make full, flat contact with the ground
- Never shim the higher side—always build up the lower side
- For ladders with adjustable leveling feet, extend or retract each foot independently until the ladder sits plumb
- Check both feet are locked in their adjusted positions before proceeding
Step 5: Verify Level and Test Stability
Before climbing:
- Use a spirit level against the side rail to check vertical plumb
- Use the level against a rung to check horizontal level
- Apply firm downward pressure on each side of the ladder base with your hands (both feet on the ground) to test for rocking or shifting
- If any movement is detected, re-adjust and recheck
Only climb when the ladder is stable and all adjustments are locked.
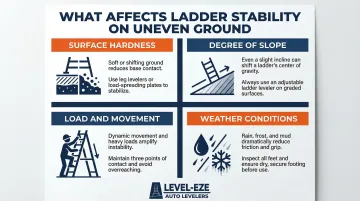
Key Factors That Affect Ladder Stability on Uneven Surfaces
Technique matters, but four variables determine whether a leveled ladder actually stays stable under load — and ignoring any one of them can undo careful setup work.
- Surface hardness: Soft ground — wet soil, grass, sand — shifts under load even after careful leveling. Options include wide foot pads, ground anchors where permitted, or relocating the base.
- Degree of slope: The steeper the drop, the less room for error. Shimming works for minor unevenness, but stairways, hillsides, and significant grade changes require dedicated leveling equipment, not improvised fixes.
- Load and movement: A ladder that feels stable empty can shift once weight is applied or the climber reaches sideways. Always test the setup under a representative load before committing to full use.
- Weather conditions: Rain, frost, and ice cut friction between ladder feet and the ground. Rubber-soled feet and ice cleats help, but wet metal surfaces should be avoided regardless of how well the ladder is leveled.
Common Mistakes When Leveling a Ladder
Skipping the Pre-Use Inspection
Many users rush to level a ladder without first checking its structural integrity. Shimming a damaged or worn ladder simply moves the failure point—it doesn't eliminate it. Always inspect before you set up.
Using Improvised or Unstable Props
Common improvised props — rocks, loose bricks, stacked scrap lumber, paint cans — all share the same flaw: they compress, shift, or crack under load. Any material under a ladder foot must be:
- Non-compressible under full working load
- Flat-topped and stable (not rounded or angled)
- Sized to fully support the entire foot pad
Anything less is a serious fall risk that violates OSHA safety standards.
Incorrect Ladder Angle
Leveling the base without verifying the 4:1 angle results in a ladder that feels stable at the feet but puts dangerous strain on the climber and the wall contact point. Research shows that reducing the ladder angle from 75° to 65° increases the required base friction by 73% — meaning a shallower angle dramatically raises the risk of the base kicking out. Too steep, and the ladder can tip backward. Angle and level are two separate checks. Confirming one without the other leaves the job half done.
When Manual Leveling Isn't Enough
Manual shimming and adjustment work reasonably well for occasional, minor unevenness. But for professionals who move ladders repeatedly throughout a workday, or who regularly work on slopes, curbs, stairs, and uneven terrain, manual methods create compounding inefficiency and safety risk. Mechanical contractors working at height climb a ladder up to 25 times an hour, wasting more than 25 minutes a day—costing $5,562 per worker annually at a $50/hour rate.
Automatic ladder levelers eliminate the need for shims, digging, or manual adjustment entirely. The Level-EZE by Jershon Inc. uses a proprietary automatic locking mechanism that self-adjusts to uneven terrain as soon as minimal weight (9 lbs) is applied — no tools or setup required.
It works on slopes, steps, curbs, and rooftop surfaces. Underwriters Laboratories tested it at four times the ladder load rating across more than 90,000 cycles without failure, and it meets all ANSI standards for portable extension ladders.
Practical benefits over manual leveling:
- Adds approximately four inches to the base width for increased stability
- Allows users to keep both hands on the ladder and both feet on the ground during adjustment
- Saves an average of six minutes every time the ladder is moved—translating to an 11% improvement in work efficiency on multi-move jobs
- Adjusts with precision down to 3/16-inch increments for up to 9.5 inches of height differential
Level-EZE is available factory-installed on ladders from Werner, Louisville, Bauer, and Little Giant, or as a retrofit attachment that installs in approximately 25 minutes.
For safety managers and fleet operators, standardizing automatic levelers across a crew removes human error from the leveling process entirely — eliminating one of the most preventable variables in workplace fall risk.
Frequently Asked Questions
What is the 3 4 5 ladder rule?
The 3-4-5 rule is a geometry-based field check: a triangle with sides of 3, 4, and 5 feet confirms a right angle at the base, helping verify proper ladder positioning. It's a useful verification tool but not a substitute for the 4:1 angle ratio used to set ladder lean.
How does a ladder leveler work?
A ladder leveler attaches to the side rails or feet of the ladder and uses adjustable or automatic telescoping legs to compensate for height differences between ladder feet. Automatic models like Level-EZE self-engage when weight is applied, requiring no manual adjustment.
What angle should a ladder be set at?
Extension ladders should be set at a 75-degree angle, following the 4:1 rule: the base should be 1 foot away from the wall for every 4 feet of vertical height. This angle applies regardless of whether the surface is level or uneven.
Can I level a ladder on stairs?
Stairs are one of the harder setups — no flat surface exists under both feet simultaneously. A ladder leveler with independently adjustable legs is your best option; manual shimming on stairs is generally unreliable and higher risk.
Is it safe to use a ladder on uneven ground without a leveler?
Shimming works on minor, stable unevenness — provided you use non-compressible material and test stability before climbing. On significant slopes, soft ground, or busy job sites, a proper leveler eliminates the instability and human error that shimming can't.
How do I level a ladder on a slope?
Identify the lower foot and build it up with a firm non-compressible shim until both feet sit flat and level. Verify with a spirit level and test stability before climbing. On steeper slopes, an automatic ladder leveler is the safer and more reliable solution.