Introduction
Uneven ground is the norm across job sites, backyards, and work areas—not the exception. Even a slight tilt compromises safety, structural integrity, and the quality of work performed on or around it. OSHA reported 421 fatal falls to a lower level in construction in 2023, underscoring the critical importance of stable, level working surfaces.
Building a level platform on uneven ground looks simple on paper, but the outcome depends heavily on slope severity, material choice, and how thoroughly you prepare the surface before building.
Skip those steps, and a platform will shift, sag, or fail within months—wasting time and money while creating new hazards in the process.
That's what this guide addresses. It covers slope measurement, material selection, the step-by-step build process, variables that affect long-term stability, common mistakes, and when a different approach is the smarter call.
TL;DR
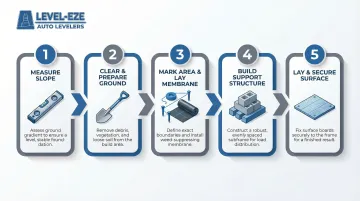
- Measure slope first using a straight board and level—the rise determines which method and materials you need
- Build in four steps: clear vegetation, mark the area, build compensating supports, then lay the level surface on top
- Key materials: UC4A-rated pressure-treated timber, concrete foundation blocks, pea gravel, and ¾" plywood
- Most common failures: skipping slope measurement, under-built supports, and poor drainage planning
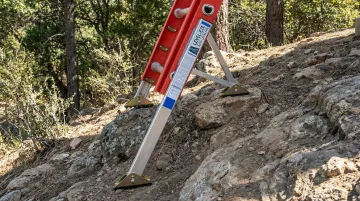
- For ladder work on uneven terrain, automatic ladder levelers eliminate the need for platform construction entirely
What You Need Before Building a Level Platform on Uneven Ground
Preparation determines the final platform's stability. Rushing this phase is the most common reason platforms shift, sag, or fail — often months after the build looks finished.
Tools and Materials Required
Essential Tools:
- Spirit level (24-inch minimum) or laser level for larger areas
- Tape measure and marking tools
- Pegs and string for layout
- Shovel or spade
- Circular saw
- Drill and deck screws (minimum 3-inch for timber connections)
- Eye protection, work gloves, dust mask
Core Materials:
- Pressure-treated timber: 4x4s for primary supports or 2x4s for lighter applications
- Concrete foundation blocks (not cinder blocks—they crack in freeze-thaw cycles)
- Adjustable leveling feet as alternative to blocks
- Weed membrane (two layers recommended)
- Pea gravel for drainage base
- ¾" plywood or OSB for surface layer
Skill and Safety Readiness
Most adults with basic carpentry skills can complete this build. That said, saws and heavy timber demand real safety awareness — eye protection, gloves, and stable footing are required throughout construction, not optional.
If the slope exceeds 12 inches across the platform's span, the structure needs engineered solutions beyond standard DIY methods. Steep slopes or platforms supporting heavy equipment warrant a structural engineer or professional contractor.
How to Build a Level Platform on Uneven Ground
Step 1: Measure and Understand the Slope
Use a long straight board and spirit level laid across the slope to find the "rise"—the vertical gap between high and low ends over the full platform length. Place the board across the intended platform area, set the level on top, and shim the low end until the bubble centers. Measure the gap between the board's bottom edge and the ground at the low point — that gap is your rise.
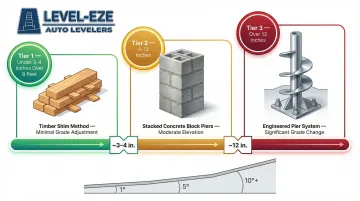
Slope thresholds that determine your approach:
- Under 3-4 inches over 8 feet: Shimmed timber framing usually sufficient
- 4-12 inches: Requires stacked concrete blocks or adjustable feet
- Over 12 inches: Demands pier system or engineered solution
Record this measurement—it determines how thick your support structure needs to be at the low end.
Step 2: Clear and Prepare the Ground
Remove all grass, weeds, roots, and debris from the platform footprint. Extend the cleared area at least 12 inches beyond the planned perimeter on all sides to allow room for drainage and future access.
Rough-level the soil with a shovel — remove obvious humps and fill obvious depressions. The support structure handles precise leveling. Avoid over-excavating, which creates soft spots that settle over time.
Step 3: Mark Out the Platform Area and Lay the Weed Membrane
Mark the footprint:
- Use pegs and string to mark exact platform boundaries
- Verify the layout is square by checking that both diagonal measurements are equal
- Make the mark slightly larger than the intended platform surface
Install drainage base:
- Lay two layers of weed membrane across the cleared area (one lengthwise, one widthwise)
- Weed membrane prevents regrowth, though landscape fabric eventually clogs with soil particles over time — so don't rely on it indefinitely
- Fill the area with 2-3 inches of pea gravel to support drainage and provide stable footing for foundation elements
Step 4: Build the Support Structure
Your approach depends entirely on the slope measurement from Step 1.
For slopes under 4 inches:
- Cut pressure-treated 4x4 timbers with angled cuts to compensate for slope
- When placed cut-side-down, each timber sits flat on the slope and presents a level top surface
- Space timbers parallel across the platform width, no more than 12-16 inches apart
- Connect timbers with cross-braces along the low end for lateral stability
For slopes over 4 inches or soft/unstable ground:
- Use stackable concrete foundation blocks arranged in a grid pattern
- Stack blocks at the low end to compensate for height differences (ASTM C90 requires minimum 2,000 psi compressive strength for loadbearing masonry units)
- Check each block with a level before proceeding
- Fill gaps between blocks with pea gravel for lateral stability
Critical checkpoint: After placing all supports, lay a long straight board across the entire structure and check with a spirit level at multiple points. Every support point must be flush before the surface layer goes on — any gap here compounds into a visible slope once decking is installed.
Step 5: Lay and Secure the Platform Surface
First layer:
- Lay ¾" plywood or OSB perpendicular to the direction of support timbers
- Secure to each timber below with deck screws at least every 12 inches
- Stagger seams so no four corners meet at one point
Second layer:
- Lay second plywood layer on top running opposite direction
- Stagger seams from first layer
- Screw the two layers together for rigidity
Per APA load-span tables, ¾-inch structural panels over 16-inch joist spacing support 128 psf at L/360 deflection limits — double-layer construction increases that capacity significantly.
Final steps:
- Check final surface with level across multiple axes before finishing
- Apply water sealant to all exposed wood edges and surfaces to prevent moisture damage, warping, or rot
- For outdoor platforms, reapply sealant annually
When Should You Build a Level Platform on Uneven Ground?
A level platform makes sense when you need a permanent or semi-permanent surface in a fixed location — not as a default solution for every uneven terrain challenge.
Ideal use cases:
- Base for shed, outbuilding, or structure
- Outdoor gym or weightlifting area
- Staging area for equipment storage
- Fixed workstation in sloped garage or basement
- Permanent work surface for machinery
When this approach becomes impractical:
- Work location changes frequently throughout the day
- Slope exceeds 18-24 inches over platform span (requiring engineered solutions)
- Budget or time is limited
- Goal is simply to safely position a ladder or work at height on shifting terrain
If that last scenario sounds familiar — ladder work on slopes, curbs, or uneven ground — automatic ladder levelers like Level-EZE handle the leveling without any construction. The leveler mounts permanently to the ladder and adjusts automatically as you position it, no blocks or digging required.
Key Factors That Affect Platform Stability on Uneven Ground
Even a well-built platform can fail or shift if these variables aren't controlled during design and construction. Four variables matter most — and getting any one of them wrong affects the others.
Degree of Slope
The greater the slope, the more structural compensation required. Steeper grades demand thicker supports at the low end, stronger framing, and precise rise-over-run measurements before a single board is cut.
Underestimate the rise and the low-end supports bear disproportionate load — they will fail first. A platform that doesn't account for full slope is unsafe for standing work or equipment placement, full stop.
Material Choice and Load Capacity
Not all materials perform equally under dynamic loads. Untreated wood decays when moisture exceeds 30%, making it unsuitable for ground contact. AWPA U1 mandates UC4A or UC4B pressure-treated ratings for any ground-contact application.
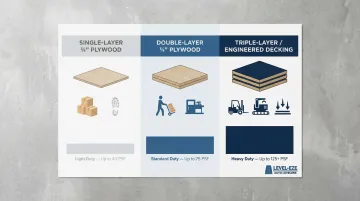
Match your material to the expected load:
- Single-layer ¾" plywood — light storage, occasional foot traffic
- Double-layer ¾" plywood — regular foot traffic, moderate equipment
- Triple-layer or engineered decking — heavy equipment, dropped weights, dynamic loads
Under-specified materials bow, crack, or develop soft spots within a season — well before the structure looks visibly compromised.
Drainage and Moisture Management
Water pooling beneath a platform is a slow structural failure in progress. It causes timber to rot, concrete blocks to shift through freeze-thaw cycles, and the ground itself to soften. Water expands 9% when freezing, generating enough internal pressure to crack porous materials from within.
In wetter climates, platforms without drainage degrade within one to two seasons. A compacted gravel base and weed membrane are the minimum — not optional extras.
Support Spacing and Distribution
Supports placed too far apart let the surface flex between contact points, producing bounce, soft spots, and stress fractures. Spacing depends on both span and expected load — there's no single number that works for every situation.
General spacing guidelines:
- 12–16 inches — general-purpose platforms with ¾" plywood
- 8–12 inches — high-impact zones where heavy items land or workers stand
- 16–24 inches — triple-layer construction or engineered decking only
Concentrate more supports beneath high-impact zones. That single adjustment extends platform life and keeps the surface level longer than almost any other design choice.
Common Mistakes When Building a Level Platform on Uneven Ground
A few consistent errors account for most failed platform builds on uneven ground. Avoid these before you cut a single board:
- Skipping slope measurement: Most slopes look shallower than they are, so builders underestimate how much height compensation the supports need. Measure rise with a level and board before cutting anything.
- Using the wrong support material: Cinder blocks crack in cold climates, untreated wood rots within a season outdoors, and single thin OSB sheets flex and fail under real load. Specify pressure-treated timber (UC4A minimum) and solid concrete foundation blocks for any outdoor build.
- Skipping the level check before laying the surface: Plywood placed on an unverified support structure feels uneven immediately and worsens as the structure settles. Check level at every support point before the first sheet goes down.
Alternatives to Building a Full Platform on Uneven Ground
In some cases, the time, cost, and permanence of a full platform build aren't justified. Faster, more flexible solutions exist depending on the specific use case.
Adjustable Screw-Jack Leveling Feet
Best for indoor use or temporary outdoor setups where the platform may need repositioning. Screw-jack feet allow precise height adjustment at each corner without cutting or stacking — industrial models like the Vestil LJ-17 support 5,000 lbs static load with 17 inches of travel.
Less permanent than timber or block foundations, and not suited for heavy outdoor loads or sustained moisture exposure without corrosion-resistant hardware (304 stainless steel recommended).
Pre-Graded Gravel or Crushed Stone Base
Works well for gentle slopes under 2-3 inches where a solid, well-drained surface is the goal. ICPI guidelines require a minimum 4 inches of compacted base at 98% standard Proctor density for pedestrian platforms — gravel can then be raked and compacted to create a near-level bed for pavers or a platform frame.
Only effective for minor slope correction. Requires a retaining border to prevent material migration and may need releveling after heavy rain or frost.
Automatic Ladder Levelers (for ladder-based work on uneven terrain)
If the goal is simply stable, level footing on a slope, an automatic ladder leveler eliminates platform construction entirely. Level-EZE attaches permanently to the ladder and adjusts automatically for steps, slopes, curbs, and rooftops — engaging with as little as 9 lbs of weight so both hands stay free during setup.
Key benefits:
- Saves an average of six minutes per ladder move
- Increases ladder base width by four inches for improved stability
- Works on level and uneven surfaces automatically
- No setup time required—instantaneous adjustment
- Adds less than 4 lbs to ladder weight
One limitation: Level-EZE addresses ladder stability, not general platform needs. It's not a substitute when a fixed horizontal work surface is required. For contractors, utility workers, and telecoms technicians who move ladders frequently across uneven terrain, though, it removes the need for any temporary leveling workaround.
Frequently Asked Questions
How do I measure the slope of uneven ground before building a platform?
Lay a long straight board across the slope, place a level on it, and shim the low end until it reads level. Measure the gap between the board and ground at the low end—that measurement is your rise over the board's length (the run).
What is the best base material for a platform on a steep slope?
For slopes over 4 inches across the platform span, stackable concrete foundation blocks are most practical. They can be stacked at the low end to compensate for height differences without excavation. Unlike cinder blocks, solid concrete blocks withstand freeze-thaw cycles outdoors.
Can I build a level platform without digging or major excavation?
Yes. Using concrete foundation blocks or adjustable screw-jack feet on top of a cleared, gravel-filled base allows you to build a level platform without major digging. The blocks or feet compensate for slope above ground rather than correcting it below.
How far apart should support timbers or blocks be spaced under a platform?
Supports should be no more than 12-16 inches apart for load-bearing platforms with ¾" plywood. In zones with heavier point loads—equipment or dropped weights—space supports 8-12 inches apart.
How do I keep a platform level long-term as the ground shifts?
Install weed membrane and pea gravel under the base to reduce soil movement, and use pressure-treated materials throughout. Check and relevel supports annually—especially after winter—and confirm drainage paths keep water from pooling beneath the platform.
Is there a faster alternative to building a platform just to stabilize a ladder on uneven ground?
Automatic ladder levelers—like Level-EZE—are designed exactly for this scenario. They attach to the ladder permanently and self-adjust on slopes, steps, and uneven terrain with no setup time, which is why professionals who reposition ladders throughout the day use them instead of building platforms.