Introduction
A wall stand-off stabilizer only works if it's installed correctly. Incorrect attachment can cause the stabilizer to shift mid-task, the ladder to kick out at the base, or contact points to fail under load — any of which can result in a serious fall.
NIOSH data shows approximately 40% of ladder-related injuries stem from the ladder sliding out at the base, and in 2020 alone, ladders were the primary source of 161 workplace fatalities.
This guide covers two audiences: homeowners handling occasional exterior work (gutter cleaning, painting trim, holiday lighting) and tradespeople — painters, siding contractors, utility workers — who use stabilizers across multiple job sites.
Whether you're installing one for the first time or tightening up your process, the steps below walk through compatibility checks, required tools, step-by-step attachment, and post-installation validation.
TL;DR
- Installation takes under 10 minutes once you've matched the right stabilizer to the right ladder
- Verify ladder rail width compatibility and clamp range before purchasing
- Secure the stabilizer at the correct rung height with both arms making firm, even wall contact
- Never position the stabilizer against gutters or window frames
- Always perform a ground-level push test before climbing to confirm no shifting
- Skipping validation or eyeballing alignment is the top cause of stabilizer failure
Installing an Extension Ladder Stabilizer
Installation follows four sequential stages: confirming compatibility, gathering tools, mounting the stabilizer to the ladder rails, and validating stability before use. Skipping any stage increases failure risk significantly.
For first-time users, allow 15–20 minutes. Experienced users typically finish in under 10 minutes. No specialist tools are required, but precise alignment is critical.
Prerequisites and Safety Considerations
Before you begin, confirm these compatibility factors:
Ladder Rail Width & Material:
- Most stabilizers accommodate a specific rail spacing range, typically 12 to 18 inches for extension ladders
- ANSI A14.2 specifies minimum clear width between side rails for metal ladders: 12 inches for ladders up to 10 feet, increasing by 1/8 inch per additional foot
- Rail material matters: fiberglass vs. aluminum affects clamp grip and torque requirements
- Example: Werner AC96 stabilizers fit aluminum rails up to 3" × 1-3/16" but are not compatible with Louisville or Little Giant ladders; Louisville PK-E03 stabilizers are restricted to fiberglass rails up to 4" × 1-3/4"
Load Capacity & Duty Rating:
- OSHA 1926.1053(b)(3) mandates that ladders not be loaded beyond manufacturer-rated capacity
- Verify the stabilizer's load rating matches or exceeds your ladder's duty rating (Type I, IA, or IAA)
Non-Negotiables:
- Check that ladder rails fall within the stabilizer's listed compatibility range before mounting
- Do not install on damaged ladders or those with cracked rungs
- Confirm the wall surface is solid: gutters, soffits, and unsupported siding are not acceptable contact points
Tools and Parts Required
Typically Needed:
- Stabilizer unit (arms, mounting brackets, clamps)
- Measuring tape to confirm rung spacing and rail width
- Wrench or ratchet matching the provided bolt size (usually 7/16" or adjustable)
- Most stabilizers ship with all necessary fasteners (U-bolts, wing nuts, or hex bolts)
Optional but Recommended:
- Work gloves for handling clamp hardware
- Helper to hold the stabilizer during first-time installation
- Marker to note correct mounting position on the rail for repeat setups
How to Install an Extension Ladder Stabilizer: Step-by-Step
Installation follows a fixed sequence. Improvising the order, particularly skipping clamp positioning before tightening, causes uneven arm contact later.
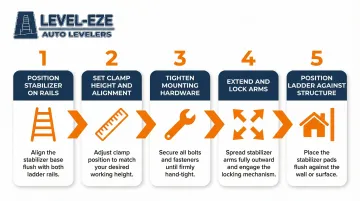
****Step 1: Position the stabilizer on the ladderSlide the mounting brackets onto the ladder's side rails at the upper section. The stabilizer should sit roughly 1–2 rungs below where the ladder will contact the structure. Center the stabilizer body across both rails before proceeding.
****Step 2: Set the clamp height and alignmentAdjust both mounting brackets to the same rung position so the stabilizer sits level across the ladder width. Mismatched bracket heights are the primary cause of one arm sitting higher than the other against the wall.
****Step 3: Tighten the mounting hardwareUsing the provided hardware and wrench, tighten clamp bolts on both brackets firmly. On fiberglass rails, avoid overtightening: most manufacturers use qualitative guidance like "tighten securely" rather than numeric torque specs, specifically to prevent crushing hollow rails. Check for rotational play once tightened. There should be none.
****Step 4: Extend the stabilizer arms to the correct widthOpen the stabilizer arms to the desired spread. Most stand-off stabilizers allow arms to straddle a window or clear an overhang. Lock arm positions according to the unit's locking mechanism before raising the ladder.
****Step 5: Position the ladder against the structureRaise the ladder and walk it into the wall so both stabilizer arm pads contact the surface simultaneously and evenly. Pads should sit flat against solid wall, not angled, not resting on trim. Confirm the ladder's base is set to the correct angle using the 4:1 rule: one foot of base distance for every four feet of working height, resulting in approximately a 75-degree angle.
Post-Installation Checks and Validation
With installation complete, a two-part check confirms the stabilizer is secure before you climb.
Visual Check:From the ground, inspect:
- Both mounting clamps sit at the same rung
- No part of the stabilizer frame is twisted or bent from transport
- Both arm pads are flush against the wall with no visible gap on either side
Functional Push Test:Before climbing, apply lateral pressure to the ladder by pushing left and right at chest height. Neither the stabilizer arms nor the mounting brackets should shift. If any movement is detected, re-tighten hardware and re-check arm pad contact.
A bracket that feels firm by hand can still have enough play to rotate 2–3 degrees under dynamic load. That small shift causes the stabilizer to walk sideways during use, and it often goes unnoticed until you're already at height.
Common Installation Problems and Fixes
Most stabilizer installs go smoothly—but when something feels off after setup, it usually comes down to one of three fixable problems. Here's how to identify and correct each one.
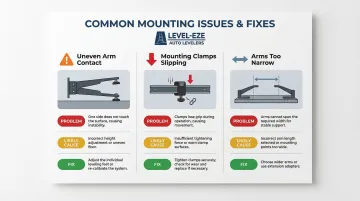
Uneven Arm Contact with the Wall
Problem: One arm pad sits flush while the other hovers slightly away, causing the ladder to lean to one side under load.
Likely Cause: The two mounting brackets were tightened at different rung heights, or the ladder isn't standing plumb before arms are locked.
Fix: Loosen both mounting clamps, re-confirm the stabilizer is centered and level across rails at equal rung heights, then re-tighten. Always check plumb before locking arm positions.
Mounting Clamps Slipping Under Load
Problem: The stabilizer physically slides down the ladder rail during use or rotates out of position when pressure is applied.
Likely Cause: Clamp bolts aren't tightened enough, or the clamp design isn't compatible with the specific rail profile (for example, I-beam rail vs. flat rail).
Fix: Re-tighten hardware to specification. If slippage continues, verify the stabilizer's listed compatibility includes the ladder's rail type. Some stabilizers require rubber-lined clamp inserts for smooth-rail aluminum ladders. If that applies to your setup, find and order the correct insert for your model before continuing use.
Stabilizer Arms Too Narrow for the Work Area
Problem: Arms aren't wide enough to clear a window or obstacle, forcing you to lean the ladder at an unsafe angle.
This typically happens when adjustable arms weren't extended to their full range before locking — or the stabilizer model simply wasn't selected for that application.
Fix: Confirm arms are fully extended and locked. If maximum arm span is still insufficient, the stabilizer model isn't suited for that application—source a wider-reach model rather than improvising positioning.
Pro Tips for Installing a Ladder Stabilizer Effectively
Mark Your Mounting Position
Once you find the correct rung height and arm spread for your most common setup, use tape or a paint marker on the rail to note the bracket position. This eliminates re-measurement on every job and speeds up deployment.
Address Base Stability Separately from Wall Stability
A wall stand-off stabilizer only solves lateral movement at the top of the ladder. On sloped driveways, curbs, or uneven terrain, the base stays unstable regardless of how well the stabilizer is installed.
For professionals working regularly on uneven ground, pairing a wall stabilizer with an automatic ladder leveler provides complete top-to-bottom stability. The Level-EZE adjusts to uneven surfaces instantly and meets all ANSI standards for portable extension ladders.
Know When to Call for a Second Person
First-time installation on a tall extension ladder is easier and safer with a helper holding the stabilizer while you tighten the mounting clamps. Solo installation at full extension height is possible, but misaligned brackets are a common result.
Conclusion
How you install a stabilizer determines whether it actually protects you. A correctly mounted stabilizer reduces the risk of a ladder shifting or kicking out during use. A poorly installed one creates a false sense of security — which can be more dangerous than working without one.
Treat the validation steps as mandatory, not optional. Confirming firm, even contact and testing for bracket movement before climbing takes less than two minutes — and those two minutes matter most once you're off the ground.
Frequently Asked Questions
Where should you place an extension ladder stabilizer?
Position the stabilizer so mounting brackets sit 1–2 rungs below the ladder's top contact point, with both arm pads making even, flat contact against solid wall—never on gutters, window frames, or unsupported siding.
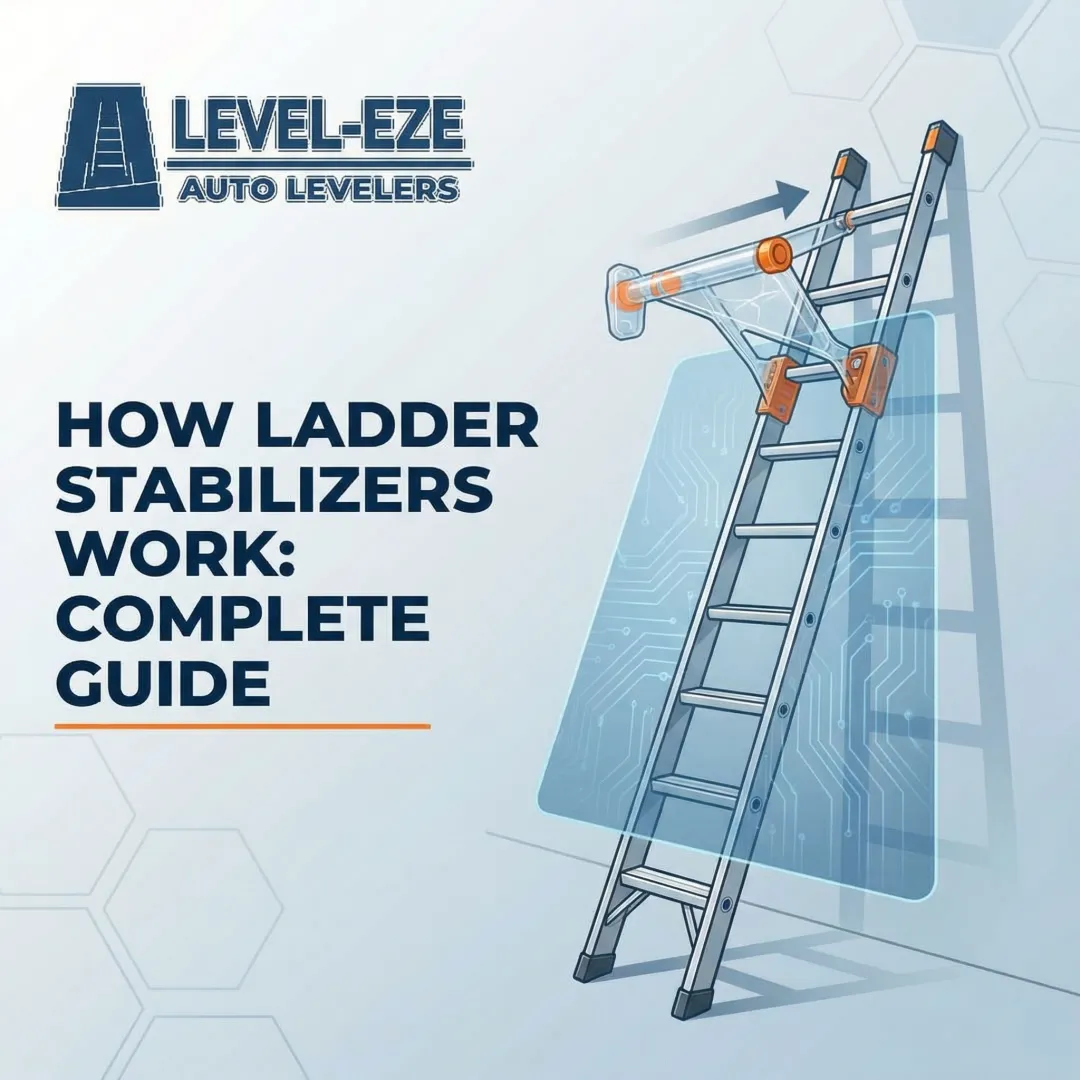
How does an extension ladder stabilizer work?
A stand-off stabilizer mounts to the ladder's upper rails and projects both arms outward so they contact a wall surface wider than the ladder itself, distributing lateral load and preventing the ladder from twisting or sliding sideways.
Can you add a stabilizer bar to any ladder?
Most stabilizers are compatible with standard extension ladders within a specific rail width and rung spacing range. Always verify the stabilizer's listed compatibility against the ladder's specifications before purchasing, as not all clamp designs fit every rail profile.
Are ladder stabilizers worth it?
For any work near windows, overhangs, or high walls, a stabilizer meaningfully improves stability and reach. OSHA ladder safety standards back their use, particularly for professionals working frequently at height.
What is the 4:1 rule for extension ladders?
The 4:1 rule means the base of the ladder should be set one foot away from the structure for every four feet of working height, resulting in a roughly 75-degree angle. This applies whether or not a stabilizer is installed, and correct base angle affects how the stabilizer arms contact the wall.
Can a ladder be permanently installed?
Standard extension ladders are not designed for permanent fixed installation, but accessories like wall stabilizers and automatic levelers can be permanently attached to the ladder itself. Factory-installed options are available through major manufacturers — Level-EZE automatic levelers, for example, ship pre-installed on ladders from Werner, Louisville, and Bauer.