Introduction
Every year, ladder-related incidents result in approximately 22,710 nonfatal workplace injuries requiring days away from work, with installation, maintenance, and construction trades bearing the brunt of these accidents. 40% of these injuries stem from the ladder sliding out at the base — caused by incorrect setup angles or unstable ground conditions.
Those numbers point to a clear pattern: the right equipment, properly understood, prevents the majority of these falls. Yet wrong product selection and improper placement remain common — often because the mechanics behind stabilizers aren't well explained.
This guide breaks down exactly how ladder stabilizers work from a physics and operational standpoint. It covers wall standoffs and base levelers so you can make better safety decisions on the job.
TL;DR
- Ladder stabilizers increase contact points between the ladder and its environment, distributing load and reducing tipping or sliding risk
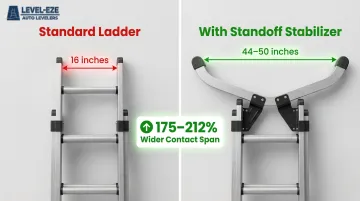
- Wall standoff stabilizers mount near the top, expanding bearing width from 16 inches to 44–50 inches to prevent lateral sway
- Base leveling stabilizers compensate for uneven ground, with automatic versions locking into position under as little as 9 lbs of weight
- Correct attachment and positioning determine whether a stabilizer delivers its full safety benefit — this guide covers both
- Each ladder move saves roughly 6 minutes with an automatic leveling stabilizer, with no manual adjustment or human error involved
What Is a Ladder Stabilizer?
A ladder stabilizer is an accessory designed to extend the contact points and base footprint of an extension ladder, thereby reducing lateral sway, base sliding, and tipping at height. Standard extension ladders have a narrow 16–20 inch stance — two contact points at the top, two feet at the base — making them inherently vulnerable to side-to-side movement and surface instability.
The core problem stabilizers solve is this narrow geometry. When a worker shifts weight or reaches laterally, the ladder's center of gravity moves outside the footprint — generating a tipping force that can flip or slide the ladder. A Loughborough University study on ladder stability devices found that manual footing provides little benefit in preventing failures at the ladder top, making engineered mechanical stabilizers the more reliable solution.
Stabilizers address this by widening the effective base and adding grip at the top. Depending on the type, they can:
- Spread the top contact points to grip both sides of a wall or window frame
- Add non-slip feet that anchor against the ground surface
- Reduce side-to-side movement when a worker shifts weight or extends their reach
- Create a standoff gap so the ladder doesn't rest directly against gutters or siding
One clarification worth making: a stabilizer supplements safe ladder practices — it doesn't replace them. Correct ladder angle (the 4:1 rule), proper weight capacity matching, and three-point contact discipline still apply. No accessory compensates for skipping the fundamentals.
Types of Ladder Stabilizers
Ladder stabilizers break down into two functional types — each designed to address a different way ladders fail. Knowing which type you need depends on where the risk actually lives: at the top or at the base.
Wall Standoff Stabilizers
These mount near the top of the ladder with wide U-shaped or V-shaped arms that brace against a wall or surface. They prevent side-to-side drift and provide standoff clearance from the surface, allowing workers to access gutters and eaves without the ladder blocking their reach.
Key distinctions:
- Adjustable-arm models can straddle windows or reach deeper eaves; fixed-depth versions suit standard wall applications
- Quick-release spring clamps (like the Werner AC78) mount faster; screw clamps (like the Little Giant WingSpan) offer a more secure hold for heavier use
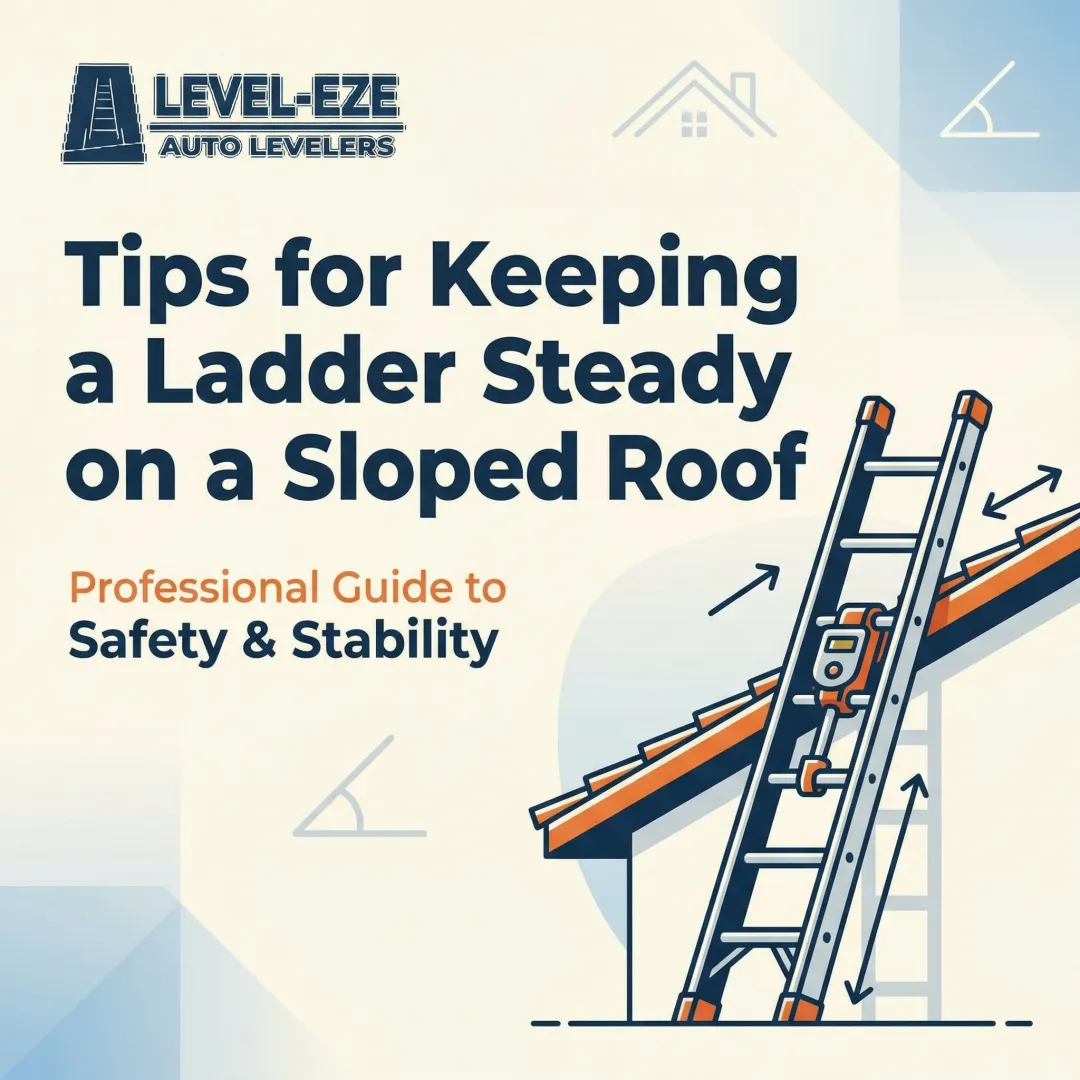
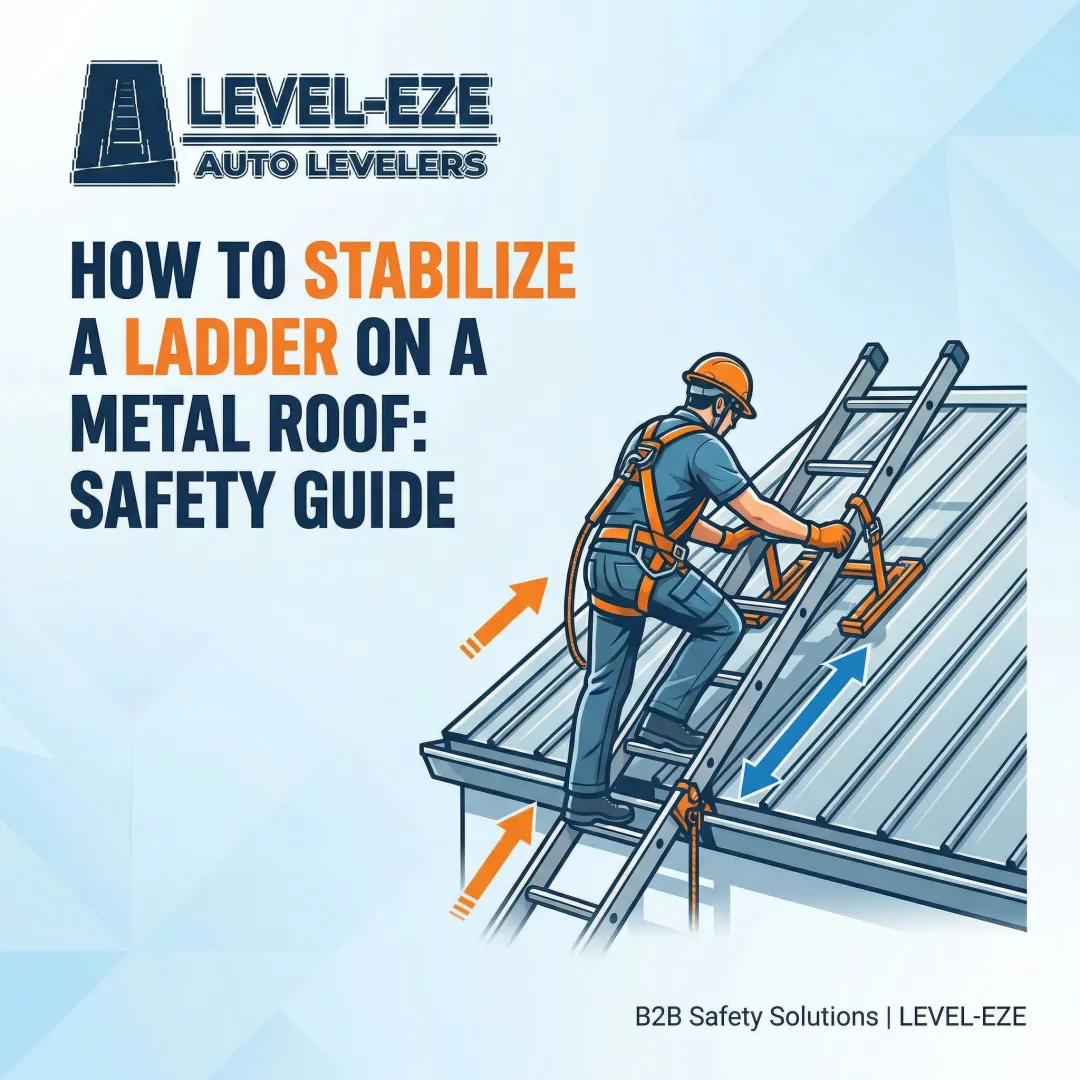
Base Leveling Stabilizers
These mount at the ladder feet to compensate for uneven ground, slopes, curbs, or stepped surfaces. They independently adjust each leg to ensure all contact points are level and firm.
Key distinctions:
- Manual models require setting each foot before climbing; automatic versions — like Level-EZE's levelers — lock into position as weight is applied, with no setup required
- Quality models handle 8.5–10 inches of height differential, covering most real-world terrain scenarios
Material, Fit, and Duty Rating
Most stabilizers use aluminum (lightweight, corrosion-resistant) or steel (heavier duty). Before purchasing, confirm compatibility across three areas:
- Rung style — D-rung, O-rung, and rail-mount stabilizers are not interchangeable
- Ladder width — stabilizers are sized for specific rail spacings, so measure before ordering
- Duty rating — the stabilizer must match the ladder's duty class (Type IAA, IA, I, II, or III) or it voids the safety rating
How Does a Ladder Stabilizer Work?
Ladder stabilizers work through two complementary physical principles: expanding the effective contact footprint and distributing applied forces across more points of contact. Both resist the primary causes of ladder failure—lateral slide and rotational tip.
The Physics of Stability
When a ladder leans against a surface, the top acts as a pivot point. Any lateral force—wind, an accidental bump, a weight shift—creates rotational torque. A wider base resists that torque far more effectively than a narrow one, which is why footprint geometry is the foundation of ladder stability.
OSHA mandates a 4:1 setup ratio (one foot of horizontal distance for every four feet of ladder height), creating a 75.5-degree angle. This specific angle balances the normal force required for base friction against the risk of backward tipping. However, this angle alone doesn't prevent lateral movement or compensate for uneven ground.
Stabilizers reduce the "tipping moment" by effectively extending the ladder's footprint. A standoff stabilizer adds approximately 24–28 inches of arm span against the wall, while a base leveler can add several inches of stance width at the ground. This expanded geometry dramatically increases the threshold force required to destabilize the ladder's center of gravity.
How Wall Standoff Stabilizers Work
Operational sequence:
- The stabilizer's arms clamp or bracket onto the ladder rails near the top
- When positioned against a surface, the rubber or padded arm ends make contact with the wall instead of the ladder rails
- This creates two widely-spaced contact points instead of one narrow contact line
The Werner AC78 expands top bearing width to 44 inches, while the Little Giant WingSpan extends to 50 inches. Compared to a standard 16-inch ladder width, this represents a 175–212% increase in lateral stability.
The standoff function: By holding the ladder several inches away from the wall (typically 10–12 inches), standoffs let workers access gutters, eaves, and siding directly above the ladder without obstruction. They also prevent the top rails from damaging soft surfaces like vinyl siding or windows.
How Base Leveling Stabilizers Work
While standoffs solve top-of-ladder stability, base levelers address the ground beneath it. On uneven terrain—slopes, steps, gravel, curbs—a standard ladder's two feet cannot simultaneously maintain full contact with the ground. One foot rocks or leaves the surface, creating a pivot point for the entire ladder to shift.
How leveling stabilizers address this:
Leveling stabilizers independently extend one or both feet to fill the height gap, ensuring all base contact points are planted. This eliminates rocking, prevents base kick-out, and allows the climber's weight to press straight down through the ladder rather than creating an off-axis force.
Automatic leveling mechanisms:
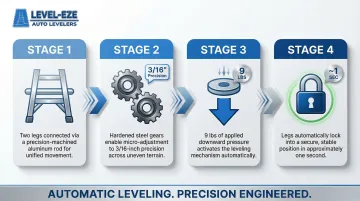
Advanced automatic levelers use weight-activated locking mechanisms. The Level-EZE, for example, employs a patented system where:
- Two legs connect via a square solid aluminum rod
- Steel gears enable precision adjustment down to 3/16-inch increments
- When as little as 9 lbs of downward pressure is applied, the legs automatically lock in position
- The entire process takes approximately one second
The Level-EZE has been life-tested through 90,000 cycles without a single failure and independently tested by Underwriters Laboratories at four times the ladder load rating. The Werner PK100 LevelSafe Pro offers up to 8.5 inches of automatic leveling height, while the Louisville LP-2220 provides similar hands-free operation. These automatic systems eliminate human error and keep both hands on the ladder during setup.
Measurable outcomes:
Proper base contact maintains the correct 4:1 angle even on slopes and eliminates the off-axis forces that lead to base kick-out. Expanding contact geometry directly increases the threshold force required for frictional failure and torsional flip—making setup safer before the first rung is climbed.
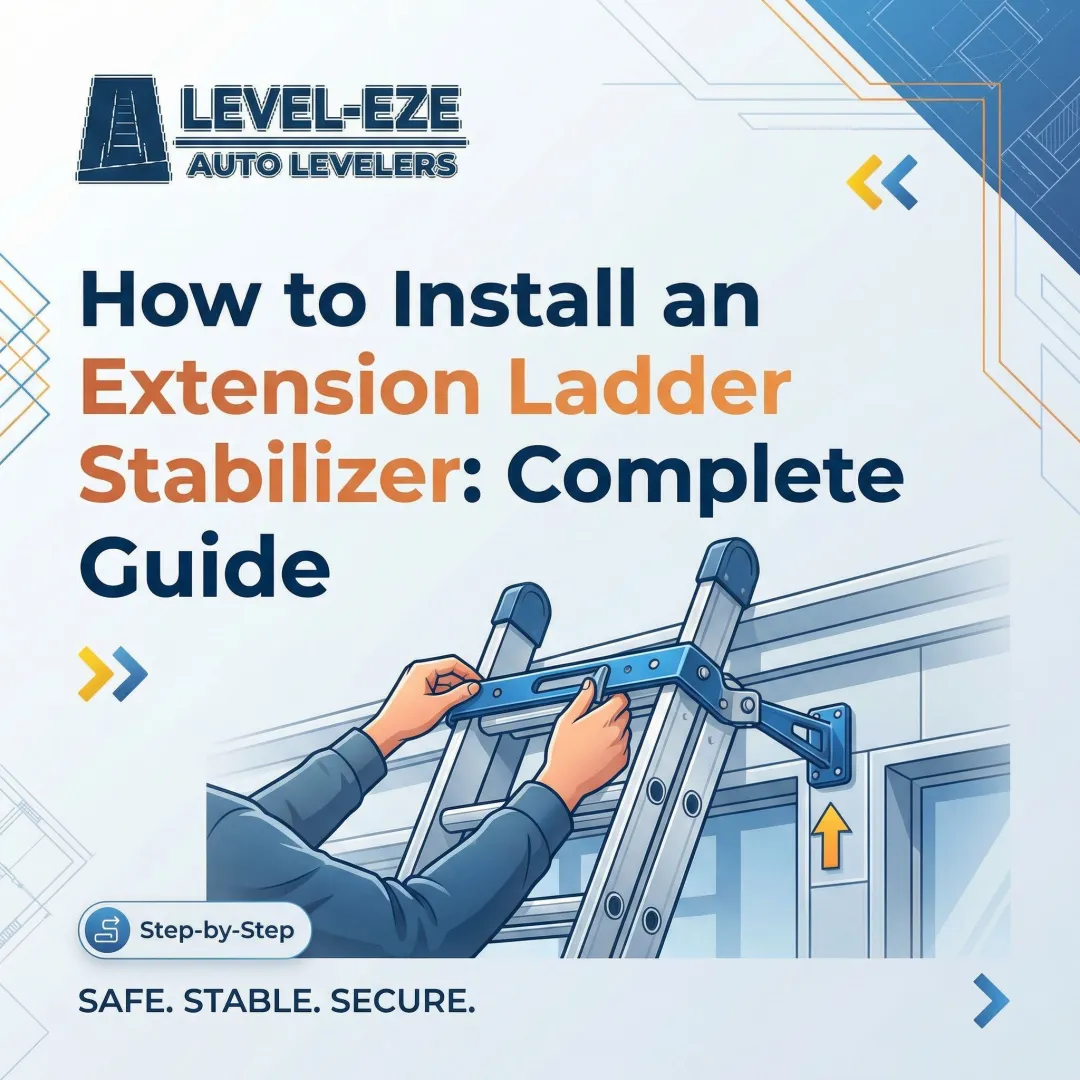
How to Attach and Position a Ladder Stabilizer
Attaching Wall Standoff Stabilizers
Most models clamp directly onto the ladder's side rails or around the rungs using integrated brackets, bolts, or quick-release clamps. Installation typically takes minutes and requires no tools for consumer-grade models like the Werner AC78 QuickClick, which uses a spring-loaded locking latch. Professional-grade versions use more permanent rail-mount brackets secured with hand-tightened screws.
Critical compatibility note: Not all stabilizers fit all ladders. Rung shape and size vary — some brackets require open D or O rung holes with a minimum 1-inch inside diameter. Always verify compatibility before purchase.
Attaching Base Leveling Stabilizers
Base levelers typically use one of two attachment methods:
- Aftermarket kits bolt directly to the ladder's siderails at the second rung from the bottom, requiring drilling and permanent installation. Level-EZE kits install in approximately 25 minutes with all hardware included (6 backer plates, 12 hex nuts, aluminum connecting rod, and template).
- Factory-installed options come pre-integrated on new ladders from Werner, Louisville, and other major manufacturers — no field installation required.
Correct Placement for Wall Standoffs
- Position the stabilizer near the top of the ladder's usable extension—not at the very tip
- Extend arms wide enough to straddle the work area (e.g., center over a window without touching glass)
- Press pads firmly against the wall surface
- Ensure both contact points are fully engaged before climbing
Setting Up Base Levelers on Site
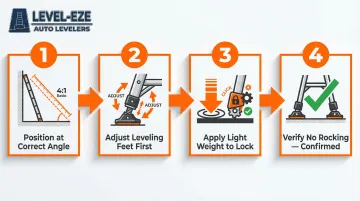
- Place the ladder at the correct horizontal distance from the wall using the 4:1 rule
- Adjust leveling feet before ascending—never attempt to adjust while on the ladder
- For automatic levelers, simply set the ladder down and apply minimal weight to engage the lock
- Verify both leveler feet are fully planted with no rocking
Pre-Climb Check
OSHA's Safe Use of Extension Ladders Fact Sheet mandates a stability check before every climb:
- Confirm both stabilizer contact points (top arms or base feet) are fully engaged
- Check for any rocking or movement
- Verify the locking mechanism is seated (for automatic levelers)
- Test the overall ladder angle and stability with a gentle shake
Run through these four points every time — it takes five seconds and costs nothing.
When and Where to Use a Ladder Stabilizer
Wall Standoff Stabilizers Are Critical For:
- Working around windows, eaves, gutters, and high exterior walls
- Painting, siding installation, roofing prep, or telecommunications line work
- Any situation where the ladder top would otherwise press directly against a vulnerable surface
- Tasks requiring lateral reach at height where drift poses a risk
Base Leveling Stabilizers Are Essential For:
- Job sites with slopes, steps, soft soil, curbs, or irregular pavement
- Utility maintenance, telecom tower work, and industrial facilities
- Residential service calls where ground is rarely perfectly flat
- Any environment requiring frequent ladder repositioning across varied terrain
For teams doing repeated ladder moves, automatic leveling stabilizers like the Level-EZE save approximately 6 minutes per repositioning, according to manufacturer data. The Level-EZE is ANSI-compliant and tested by Underwriters Laboratories — and by eliminating hole-digging or block stacking, it also cuts the physical risk of back injuries during setup.
When NOT to Rely on Stabilizers Alone
OSHA 1926.1053(b)(7) explicitly prohibits ladder use on slippery surfaces unless secured or provided with slip-resistant feet. The American Ladder Institute further dictates that ladders must never be used in high winds, storms, or when ice or frost conditions are present.
Stabilizers add a real margin of safety — but they work best as part of a complete protocol that includes proper ladder selection, 3-point contact, and user training. No stabilizer overrides the physics of ice or severe wind loads.
Frequently Asked Questions
How does a ladder stabilizer attach?
Most wall standoff stabilizers clamp onto the ladder's side rails or rungs using brackets or bolts near the top. Base leveling stabilizers bolt directly to the side rails at the second rung from the bottom, requiring drilling for permanent installation. Factory-installed options from Werner, Louisville, and other manufacturers require no field assembly.
Where should you place a ladder stabilizer?
Wall standoff stabilizers are placed near the top of the ladder so the arms contact the wall surface on either side of the work area. Base levelers are positioned at the feet and adjusted to match ground level before climbing—never adjust while on the ladder.
Are ladder stabilizers safe?
When used correctly and matched to the right ladder type, stabilizers are a proven safety tool. Quality stabilizers meet ANSI A14.8-2020 standards and should be tested by recognized laboratories. They reduce the risk of lateral tip and base slide but must be combined with proper ladder angle and climbing technique.
Are ladder stabilizers worth it?
Yes, especially for frequent users. Professional-grade automatic leveling stabilizers save approximately 6 minutes per repositioning, eliminate improvised leveling methods like blocks or hole-digging, and can increase overall work efficiency by 11%. For contractors and utility workers repositioning ladders dozens of times per week, that adds up fast.
Can you add a stabilizer bar to any ladder?
Not all stabilizers fit all ladders. Compatibility depends on rung style (D-rung, O-rung, rail-type), ladder width, and load rating. Always verify that the stabilizer is rated for the same duty class as the ladder and check the manufacturer's compatibility guide before purchasing. Some installations require specific spacer plates for proper fit.
What is the 4:1 rule for extension ladders?
The 4:1 rule means the base of the ladder should be placed one foot away from the wall for every four feet of ladder height, creating roughly a 75-degree working angle. This rule applies whether or not a stabilizer is used, as stabilizers add lateral stability but do not correct an improper lean angle.