Introduction
In 2020, ladder-related incidents claimed 161 lives at U.S. workplaces, with portable extension ladders accounting for 105 of those fatalities, according to the Bureau of Labor Statistics. The National Institute for Occupational Safety and Health (NIOSH) found that approximately 40% of ladder injuries stem from the ladder sliding out at the base due to improper setup angles. That risk multiplies sharply on sloped terrain.
Every ladder is engineered with one critical assumption: flat, level ground. When that foundation disappears on a hill or slope, a routine task becomes genuinely dangerous. Uneven ground creates unequal load distribution between the ladder's two rails, sharply increasing the likelihood of twisting, lateral collapse, or sudden base slip.
This guide covers:
- How to assess slope conditions before you set up
- The exact steps to properly level a ladder on a hill
- Tools and devices that make hillside work safer
- The most dangerous mistakes workers and homeowners make when improvising on uneven terrain
TL;DR
- Never prop ladder feet on rocks, bricks, or lumber to compensate for a slope — use a proper leveling device instead
- Maintain the 4:1 angle ratio (one foot of base distance per four feet of height) regardless of terrain
- Secure both stiles at the top with rope or straps to prevent lateral movement
- Check the ground for soft soil, wet grass, loose gravel, or runoff before setting up
- Test stability with downward and sideways pressure before climbing
Why Leveling a Ladder on a Hill Is a High-Risk Task
When a ladder sits on a slope, one rail bears disproportionate weight while the other loses contact stability. This uneven load transfer increases the risk of the ladder twisting, rotating, or collapsing mid-climb. Research shows that 40% of ladder-related injuries are attributed to improper placement or base instability—risks that compound significantly on sloped terrain.
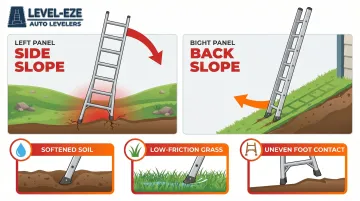
Ladder safety professionals distinguish between two types of slope:
- Side slope: Lateral tilt across the ladder's width (perpendicular to the direction you climb)
- Back slope: The angle of the surface the ladder leans against or stands on (parallel to your climbing path)
Side slopes create far greater danger for extension ladders because they directly compromise the equal rail support that prevents lateral tipping. OSHA regulations mandate that ladders be used only on stable and level surfaces unless secured to prevent accidental displacement.
Hills introduce compounding hazards that indoor uneven floors don't. Several terrain-specific factors work against you:
- Softened soil: Rain runoff reduces ground density, weakening the holding strength of ladder feet
- Low-friction grass: Turf provides minimal grip, allowing feet to slide under load
- Uneven foot contact: The low-side foot digs in while the high-side foot rides up, accelerating lateral instability
Any one of these conditions raises risk. All three together mean even a small weight shift can trigger sudden ladder movement.
Before You Set Up: Safety Precautions on a Hill
General Safety Precautions
Start with proper personal protective equipment:
- Non-slip footwear with adequate tread
- Work gloves for secure grip during ladder positioning
- Fall arrest harness or lanyard for work above 6 feet on unstable terrain
Inspect the ladder thoroughly before hillside deployment:
- Check that both rubber foot pads are intact and securely attached
- Verify all rungs are tight with no wobble or movement
- Examine side rails (stiles) for warping, cracks, or damage
- Test any existing leveling device to confirm smooth operation
Measure slope severity before placement using a smartphone level app or manual level. OSHA requires stable and level surfaces, though authoritative standards do not specify numeric maximum slope angles.
If your assessment shows significant side slope or terrain instability, a dedicated leveling device becomes mandatory. On very steep grades, consult a safety professional before proceeding.
Site Preparation on a Slope
Prepare the footprint where the ladder will sit:
- Clear loose debris, wet leaves, gravel, and organic matter
- Press down soil to create firm footing, especially on the uphill side
- Place a non-slip ladder mat under both feet if available
- If soil is soft on the high side, pack it firmly to prevent the foot from sinking under load
One common field workaround is digging a level pocket on the high side for moderate slopes. Digging loosens and softens soil, though, creating its own stability risks. A purpose-built mechanical leveling device is the preferred professional solution—it maintains soil integrity while adding roughly four inches to the ladder's base width for a more stable stance.
How to Level a Ladder on a Hill: Step-by-Step
Step 1: Position the Base Correctly
Place the ladder feet as close to perpendicular to the slope as possible. On a hillside, the uphill foot will naturally sit higher than the downhill foot. Identify which side needs accommodation before applying any weight to the ladder.
Step 2: Apply a Leveling Device
Two main categories of leveling solutions exist:
Adjustable leg extensions built into some ladder models require manual setting before climbing. Adjusting leg length while controlling the ladder divides your attention at the moment it matters most.
Automatic leveling attachments lock into position the moment weight is applied, requiring no manual adjustment. Level-EZE's automatic leveler, for example, engages the moment 9 pounds of pressure is applied — both hands stay on the ladder, both feet stay on the ground throughout setup. Key specs:
- Adjusts up to 9.5 inches of height difference
- Precision down to 3/16-inch increments via steel gears
- Meets all ANSI standards for portable extension ladders
- Tested by Underwriters Laboratories at four times the ladder load rating

Step 3: Verify the 4:1 Angle
Once the base is leveled, confirm the proper lean angle. OSHA mandates that non-self-supporting ladders be used at an angle where the horizontal distance from the top support to the foot is approximately one-quarter of the working length—creating a 75.5-degree angle.
Practical verification method:
- Stand at the base with toes touching the ladder feet
- Extend your arms straight out at shoulder height
- Your hands should just reach the rung directly in front of you
This 4:1 ratio must be maintained on a slope just as strictly as on level ground. The angle must be correct relative to where the ladder leans at the top, regardless of the terrain beneath.
Step 4: Secure the Top
With your angle confirmed, climb carefully to the top and tie both stiles to a fixed anchor point. On a hill, lateral movement risk increases dramatically — skipping this step significantly raises tip-over risk on sloped terrain.
How to secure properly:
- Wrap rope or straps around both side rails near the top
- Tie to a stable structural point (chimney, rafter, solid pipe, or structural beam)
- Use a secure knot that won't slip under tension (bowline or clove hitch)
- Ensure the tie-off prevents sideways movement without pulling the ladder away from proper angle
Step 5: Test Before Full Climb
Perform the shake test before ascending. Apply firm downward pressure by gripping a middle rung and pushing. Then apply sideways pressure in both directions. A stable ladder should feel rock-solid with minimal flex. If you detect any movement, side-to-side play, or shifting, reposition before proceeding.
Environmental Conditions That Increase Slope Hazards
Wet conditions on a hill directly undermine ladder safety. Rain, morning dew, and irrigation runoff reduce grip on both the ladder feet and your footwear while softening soil and reducing the holding strength of any anchored or positioned base. Check weather forecasts before beginning hillside ladder work and avoid setup during or immediately after precipitation.
Wind adds a separate layer of risk on hillside setups. On a hill, your ladder already has a compromised base — wind pushes laterally on both the ladder and your body, and the natural lean of a hillside means the ladder may already be side-loaded before any wind force is added.
OSHA doesn't specify numeric wind-speed thresholds, but safety guidance is consistent: "Do not use ladders in high winds." If wind creates any risk of displacement, suspend ladder work.
Surface type interacts directly with slope. Different materials behave differently under ladder load on a hill:
- Grass: Provides the least resistance to sliding; roots compress and blades flatten
- Gravel: Shifts under foot pressure, especially on inclines where gravity pulls material downhill
- Mud: Compresses unevenly, with the downhill foot often sinking faster
- Packed soil: Offers the most stability but still softens with moisture

OSHA regulations require that ladders not be used on slippery surfaces unless secured or provided with slip-resistant feet. Ground preparation matters more on a hill than on flat surfaces because the slope amplifies every surface instability.
Common Safety Mistakes to Avoid When Using a Ladder on a Hill
Propping Feet on Improvised Supports
Using rocks, bricks, scrap lumber, or stacked boards to compensate for slope height differences ranks among the most common and dangerous ladder mistakes. OSHA explicitly prohibits placing ladders "on boxes, barrels, or other unstable bases to obtain additional height."
These materials can:
- Compress under load, especially on soft ground
- Shift or rotate as weight distribution changes during climbing
- Break or crumble under stress
- Slide on the slope surface due to inadequate friction
On a slope, lateral stress on the ladder feet is already elevated compared to level ground. Improvised supports lack the locking mechanisms and load distribution of purpose-built leveling devices — ones tested to specific safety standards and designed to handle real working forces.
Ignoring Side Slope Severity
Many users place ladders on hills without measuring slope angle, assuming it "looks okay." No standard sets a precise numeric threshold, but significant side slopes push weight distribution well outside safe operating parameters.
When one rail sits substantially higher than the other, the ladder experiences one-sided loading. This creates a tipping moment that can cause sudden lateral collapse, especially if you shift your weight or work to one side. The failure isn't gradual — it's sudden and uncontrolled.
Skipping Top Tie-Off for "Short Jobs"
Job duration doesn't change physics. On sloped terrain, even a small lateral bump or weight shift can cause the top of the ladder to skate sideways — and skipping the top anchor removes the one thing stopping it.
OSHA requires securing or barricading in specific circumstances, and hillside work creates conditions where ladder displacement risk is inherently elevated. The few minutes required to properly tie off can prevent the sudden lateral movement that causes most hillside ladder falls.
Overreaching While on a Hillside Ladder
The standard "belt buckle inside the rails" rule applies even more strictly on a slope. The American Ladder Institute instructs users to keep "the center of your belt buckle (stomach) between the ladder side rails when climbing and while working."
On a hillside, your center of gravity is already offset from where it would be on flat ground. Overreaching amplifies that imbalance more than it would on level terrain.
Move the ladder instead of stretching. Repositioning takes 60 seconds. Recovering from a fall takes much longer.
Frequently Asked Questions
What is the 4 to 1 rule on a ladder?
For every 4 feet of ladder height, place the base 1 foot away from the wall or structure—creating approximately a 75-degree lean angle. This ratio prevents base slide-out and must be maintained on a hill exactly as on level ground.
What is the 3 point rule on a ladder?
Maintain three points of contact at all times while climbing: either two hands and one foot, or two feet and one hand. This rule is especially critical on hillside terrain, where shifting weight unexpectedly can compromise your footing faster than on flat ground.
How steep is too steep to use a ladder on a hill?
OSHA requires stable, level surfaces, but authoritative standards don't specify numeric slope limits. If the slope is steep enough that ground stability cannot be assured even with a proper leveling device, the ladder is not safe to use at that location — choose a different setup point or access method.
Can you use an extension ladder on a sloped surface?
Yes, but only with proper precautions: a tested leveling device, correct 4:1 angle setup, top tie-off, and thorough ground preparation. No improvised leveling method safely replaces a rated device that meets ANSI standards and has been tested for ladder loads.
Do you need to secure a ladder at the top when working on a hill?
Yes. Tying off both stiles at the top is required on any slope. Hillside terrain increases lateral shifting risk, particularly when you shift weight or reach to one side during the task.
What is the safest way to level a ladder on uneven ground or a hill?
Use a tested, ANSI-compliant automatic leveling device that adjusts to terrain without manual measuring or bending down. This keeps both hands on the ladder and both feet on the ground throughout setup — removing the guesswork that leads to unstable placement.