Introduction
Working above a staircase is one of the most common home and job-site tasks, yet stairs create an uneven surface that makes standard ladder placement unstable and dangerous. When one ladder foot sits on a higher tread than the other, the entire weight distribution shifts—making the ladder prone to sliding, tipping, or wobbling at the worst possible moment.
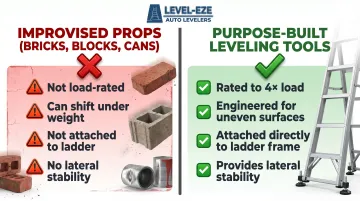
Many people improvise with paint cans, bricks, or wooden blocks under the lower foot to compensate for the height difference. These props aren't rated for load, can shift unexpectedly, and aren't secured to the ladder — which is exactly why they cause falls.
The numbers reflect how serious this gets: in 2020, ladder-related incidents resulted in 161 workplace fatalities and 22,710 nonfatal injuries requiring at least one day away from work. About 40% of ladder injuries occur when the ladder slides out at the base — a risk that increases sharply on stairs where the feet sit on two different levels.
Below, you'll find the right equipment to use, a step-by-step leveling process, the safety rules that actually affect stability, and the mistakes most people make before something goes wrong.
TL;DR
- Always use a purpose-built leveling tool rated to 4× the load—never improvised props like boxes or bricks
- The 1-in-4 rule (one foot of base distance per four feet of height) still applies on stairs and prevents sliding
- Verify all locks engage and check stability before stepping on the ladder
- Use a spotter when possible, or secure the ladder to a railing or wall anchor when working alone
- Automatic levelers like Level-EZE lock into position on contact, are tested to 4× the ladder's load rating, and meet ANSI standards
What You Need Before You Start
Equipment and Tool Requirements
Choose the Right Leveling Solution
There are three main tools designed for leveling ladders on stairs:
- Ladder leveler attachment — Clamps to one or both rail feet and adjusts independently to accommodate the height difference between treads
- Ladder platform/stand — Sits across two stair treads, creating a stable base for the ladder feet
- A-frame ladder with adjustable legs — Self-supporting design with telescoping legs that adjust to different heights
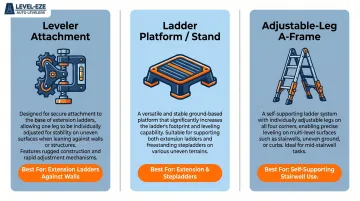
When to Use Each Option:
- Leveler attachments work best for extension ladders leaning against walls or upper landings
- Ladder platforms suit both extension and stepladders and are ideal for occasional use
- Adjustable-leg A-frames provide stability for self-supporting tasks in the middle of a stairwell
Load Rating is Non-Negotiable
Any leveling tool must be rated to support at least 4× the maximum intended load — because the accessory bears the combined weight of the ladder, the climber, and any tools being carried. OSHA 29 CFR 1926.1053(a)(1)(i) requires that portable ladders sustain at least four times the maximum intended load without failure. Generic wedges or blocks don't meet this standard. Purpose-built stair tools offer better lateral stability because they're engineered for uneven surfaces and attach directly to the ladder frame.
Automatic Levelers: Built for Frequent and Professional Use
For frequent users or professionals, automatic ladder levelers handle adjustment automatically — no manual configuration needed. Level-EZE's automatic leveler is worth considering because it:
- Installs permanently on the ladder's rail feet
- Adjusts automatically to uneven surfaces (up to 9.5 inches) without manual configuration
- Meets all ANSI standards for portable extension ladders
- Has been tested by Underwriters Laboratories at four times the ladder's load rating
- Engages automatically with as little as 9 lbs of pressure, locking in approximately one second
Level-EZE's leveler adds approximately 4 inches to the base width, increasing overall stability — a critical advantage on stairs where lateral movement is the primary tip risk.
Conditions and Pre-Climb Checks
Inspect the Ladder Before Setup
Check for these failure points:
- Bent or cracked rails
- Missing or worn rubber feet
- Cracked or loose rungs
- Missing locking mechanisms on extension sections
Never use a damaged ladder on stairs. The uneven base amplifies any structural weakness.
Assess the Stair Surface
Before placing any equipment:
- Confirm treads are dry and not slippery
- If carpeted, verify the carpet is firmly attached and won't shift under load
- Clear the staircase of clutter, tools, or debris that could cause a trip
- Check for loose or damaged treads that may not support the full load
OSHA 29 CFR 1926.1053(b)(6) mandates: "Ladders shall be used only on stable and level surfaces unless secured to prevent accidental displacement". Stairs don't meet the "level" test — which is why leveling equipment and proper anchoring are required, not optional.

How to Level a Ladder on Stairs: Step-by-Step
Step 1: Choose Your Placement and Measure the Height
Identify the exact tread(s) the ladder will rest on and estimate your working height. The higher you need to climb, the farther out the base must extend to maintain the 1-in-4 angle. Staircase depth may limit where you can realistically set up.
Confirm there's a stable contact point at the top:
- A solid wall
- A secure railing
- An upper landing edge
Avoid resting the ladder against window glass, gutters, or unsecured trim.
Step 2: Set Up the Leveling Device
For a leveler attachment:
- Clamp it to the appropriate rail foot (typically the lower-side rail when one foot will be on a lower tread)
- Pre-set the extension length to approximately match the stair riser height before placing the ladder
- Ensure the clamp is fully tightened before adding any weight
For a ladder platform:
- Assemble the base on the lower stair tread and the platform on the upper tread
- Insert all locking pins fully before placing the ladder
- Ensure the ladder feet sit securely between the platform's safety ridges
For automatic levelers like Level-EZE:
No pre-adjustment is needed. Simply place the ladder in position—the leveler adjusts automatically upon placement and locks when weight is applied.
Step 3: Position the Ladder and Check Level
**Place the ladder on the leveling device** and verify:
- Both feet (or platform contact points) are in full contact with tread surfaces
- There's no rocking or tipping when you apply light hand pressure
- A small bubble level on the ladder rail confirms the ladder is plumb (vertical)
Apply the 1-in-4 rule:
Quick measurement method:
- For every 4 feet of ladder height, the base should sit 1 foot away from the wall
- Example: If the ladder reaches 12 feet high, the base should be 3 feet out from the wall
Check that the staircase depth allows this clearance. If not, adjust tread placement or choose a different setup location.
Step 4: Engage Locks and Test Stability
Engage all locking mechanisms fully:
- Press down on foot pins
- Engage locking pins on platforms
- Verify auto-locking mechanisms have triggered (for automatic levelers, this happens with as little as 9 lbs of pressure)
Once everything is locked, run a quick stability test before your first step:
- Apply gradual downward pressure with both hands on a rung
- Apply slight lateral (side-to-side) force to check for wobble or slippage
- Check that both feet remain in full contact with their surfaces
- Verify the top contact point doesn't shift
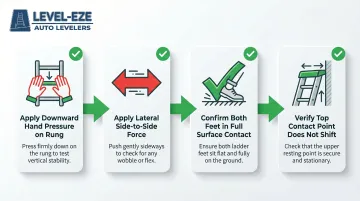
If anything moves, re-adjust before climbing.
Step 5: Climb Safely and Maintain Position
Maintain three points of contact while climbing:
- Two hands + one foot, or
- Two feet + one hand
OSHA 29 CFR 1926.1053(b)(22) requires: "An employee shall not carry any object or load that could cause the employee to lose balance and fall". Use a tool belt or have a spotter hand items up—never carry large or heavy objects while ascending.
Keep your hips and chest between the side rails at all times. If you need to reach farther, descend and reposition the ladder.
On stairs, reaching past the rail edge shifts your center of gravity beyond the base. That's the leading cause of tip-overs in staircase setups.
Key Safety Rules That Affect Stability on Stairs
Stairs amplify the consequences of any setup error. A fall won't land on flat ground but on the edge of a stair tread, which dramatically increases injury severity.
The 1-in-4 Rule (Ladder Angle)
OSHA establishes a 75.5° angle for load testing non-self-supporting ladders. This angle distributes weight correctly between the wall contact point and the ladder feet.
Deviation in either direction increases the risk of the ladder shifting under bodyweight:
- Moving too close to the wall reduces lateral stability and causes swaying
- Moving too far out reduces foot contact and risks the base sliding away — especially dangerous when one foot sits on a different tread level
On stairs, a leveling device also relies on this angle to maintain proper contact pressure on both treads.
Three Points of Contact Rule
Losing one contact point on a staircase ladder is riskier than on flat ground because:
- The ladder has less stable footing
- The climber has less room to recover if they start to slip
- The fall distance may be greater due to the stairwell opening
Tools, paint cans, or materials carried in hand remove one contact point. Always stage materials above or use a spotter to pass items up. Research shows overreaching accounts for 4% to 19% of ladder falls, and that risk is compounded on stairs.
Ladder Extension Height (for Extension Ladders)
Insufficient rail extension means the climber has nothing to hold while transitioning off the ladder — a particular risk in stairwells where the upper surface is typically a landing or upper floor.
Without the 3-foot extension, you have no stable grip point when transferring weight onto the landing. You're stepping off a ladder while it's still partially supporting you. That's when most top-of-ladder falls happen.
Common Mistakes to Avoid When Leveling a Ladder on Stairs
Using Improvised Leveling Props
Never use paint cans, bricks, wood scraps, or single blocks to level a ladder.
OSHA Fact Sheet 3662 explicitly prohibits: "Place a ladder on boxes, barrels or other unstable bases". These props:
- Are not load-rated
- Can shift or compress unexpectedly under weight
- Are not attached to the ladder, so they can slide out independently
- Provide no lateral stability
Industry professionals consistently flag improvised leveling as the most dangerous and most common mistake on job sites. OSHA accident reports document injuries from this practice, including one case where an employee was injured after placing a 2×8 inch block under an A-frame ladder.
Skipping the Load Test and Locking Check
Many users place the ladder, feel it seems stable, and immediately climb — skipping the one check that catches most setup failures. When a locking pin isn't fully engaged or an auto-lock hasn't triggered:
- The ladder can shift the moment weight is applied
- One foot can slip off the tread edge
- The leveling device can collapse or slide
Always complete the hand-pressure stability check before the first step. Push down, pull sideways gently, and confirm nothing moves.
Overreaching or Failing to Reposition
On stairs, repositioning is more time-consuming than on flat ground, so climbers stretch sideways to avoid moving the setup. This shifts the center of gravity outside the base footprint and is a primary cause of tip-overs on stair setups.
Follow the guideline from experienced tradespeople: keep your chest between the rails. If you can't reach something while maintaining this position, descend and reposition the ladder.
Ignoring Surface Conditions on Carpeted or Wet Stairs
- Carpeted stairs may feel stable initially but can allow slow creep under sustained load as the carpet compresses
- Wet or painted wooden treads dramatically reduce friction for both the leveling device and ladder feet
- Worn or polished treads offer less grip than new, textured surfaces
Check and address surface conditions before setup, not after you've climbed up and noticed the ladder shifting.
When to Skip the Ladder Entirely: Alternatives for Stair Work
A ladder leveler resolves most staircase geometry problems — but some jobs are too high, too narrow, or require too much repositioning for any ladder setup to remain practical. When the 1-in-4 rule cannot be satisfied even with proper leveling equipment, a ladder should not be used.
Scaffolding
Best for: Extended projects like full stairwell painting, drywall installation, or multi-day repairs
Scaffolding creates a continuous working platform across the stair opening. Key trade-offs to weigh:
- Eliminates repeated ladder repositioning on long jobs
- Requires setup time and rental cost
- Better suited to commercial or multi-day projects than quick single tasks
Extension Poles and Lifts
Best for: Painting, light fixture swaps, or tasks where physical contact with the work surface isn't required
- Extension poles eliminate the need for a ladder altogether for low-to-medium heights
- Push-around vertical (PAV) lifts or scissor lifts provide a rated working platform in commercial settings where staircase geometry makes a stable ladder setup impossible
Conclusion
Leveling a ladder on stairs is achievable safely when the right tool is in place, the 1-in-4 rule is respected, and every locking mechanism is verified before climbing. Most stair ladder accidents stem from two root causes—improvised leveling props and skipping the stability check—both of which proper preparation eliminates entirely.
Whether you're a homeowner swapping a light bulb or a contractor running stairwell jobs daily, an automatic ladder leveler removes the guesswork from setup. Products like Level-EZE adjust instantly underfoot, lock with as little as 9 lbs of pressure, and meet ANSI standards — so the foundation is solid before you take the first step up.
Frequently Asked Questions
What is the 7-11 rule for stairs?
The 7-11 rule is a stair construction standard specifying that risers should be no more than 7 inches tall and treads no less than 11 inches deep. The 2021 International Residential Code sets riser height at 7¾ inches maximum and tread depth at 10 inches minimum, and these dimensions determine the tread spacing and height difference your leveling tool must accommodate.
What is the safest way to use a ladder on stairs?
Use a purpose-built leveling tool rated to 4× the load and apply the 1-in-4 angle rule. Verify all locks before climbing, maintain three points of contact at all times, and keep both hands free — never carry objects while ascending.
Can you use a regular ladder on stairs without a leveling device?
No. A standard ladder can only be used on stairs with a proper leveling accessory. Placing it directly on uneven treads creates an unstable base that can shift under load, and improvised props like blocks or bricks are not a safe substitute.
What is the 1-in-4 rule for ladders?
For every 4 feet of ladder height, the base should be positioned 1 foot away from the wall or support surface. This creates approximately a 75° angle that balances weight distribution between the base and lean point, preventing both backward and forward tip.
Do I need a spotter when using a ladder on stairs?
Always use a spotter when working on stairs — the uneven base increases the risk of shifting compared to flat ground. If working alone, secure the ladder to a handrail or wall anchor before climbing.
What type of ladder leveler works best for frequent stair use?
Permanently installed automatic levelers are the most efficient for professional or frequent use because they require no manual adjustment. Standalone ladder platforms are a cost-effective option for occasional homeowner use.